

Posted on:
August 4, 2026
How to Add Audio to Google Slides
Learn how to add audio to Google Slides in 2026 with step-by-step methods, Drive setup, autoplay fixes, and troubleshooting tips.
How to Add Audio to Google Slides (Step-by-Step Guide for 2026)
If you have been clicking around Google Slides looking for a simple audio upload button, you are not alone. Google Slides recently added a direct upload option, but it has format restrictions and account requirements that catch most people off guard. The faster, more reliable method still goes through Google Drive first, and this guide walks you through both options step by step.
This post is part of our complete guide to adding media in Google Slides, covering everything from audio and video to GIFs, drawings, and voiceovers.
This guide covers how to add audio to Google Slides in both methods, how to set up autoplay and background music, device-specific instructions for Chromebook, iPad, and Android, free royalty-free audio sources, and fixes for every common audio problem.
Looking specifically for background music? See our dedicated guide on how to add music to Google Slides.
What You Need Before Starting:
- A Google account (free)
- Your audio file on your computer (MP3 or WAV format — most reliable)
- Google Drive (free — comes with every Google account)
- Google Chrome browser (recommended — most reliable for media)
- A working internet connection
Two Ways To Add Audio, Know The Difference:
METHOD 1: Via Google Drive (recommended):
Upload your audio to Google Drive first, then insert it into your slides from Drive. Works for all accounts. Supports MP3 and WAV.
Method 2: Direct Device Upload:
Click Insert > Audio > Audio (from your device). Available on most accounts in 2026, but has known limitations with some formats and shared viewers.
What You Need Before Adding Audio to Google Slides
Before you start, make sure your audio file is in a format Google Slides actually supports. This is the step that causes the most confusion, and getting it wrong means your audio silently fails to upload with no clear error message.
Officially supported audio formats:
- MP3: Most common, most reliable. Use this by default.
- WAV: High quality, larger file size. Fully supported.
OGG format:
This format may work in some accounts, but it is NOT officially listed by Google as supported. Use MP3 instead to avoid any compatibility issues.
Note: If your file is in AAC, M4A, WMA, FLAC, or AIFF, convert it before uploading
GOT AN UNSUPPORTED FORMAT?
If your audio file is AAC or M4A (common on iPhone), convert it free at CloudConvert. Select your file → choose MP3 as output → download. Takes under 60 seconds.
Maximum audio file size: 100 MB is the maximum file size. If your file is larger, compress it for free at MP3Smaller.com before uploading. Keep files under 20 MB where possible to avoid buffering delays during presentation.
How to Add Audio to Google Slides — Step-by-Step (Both Methods)
Method 1: Via Google Drive (Recommended for All Users)
This is the recommended method because Drive handles file sharing correctly. Meaning your viewers will actually hear your audio when you share the presentation. Method 2 is faster but requires the same sharing verification step anyway.
Phase 1: Upload Your Audio File to Google Drive
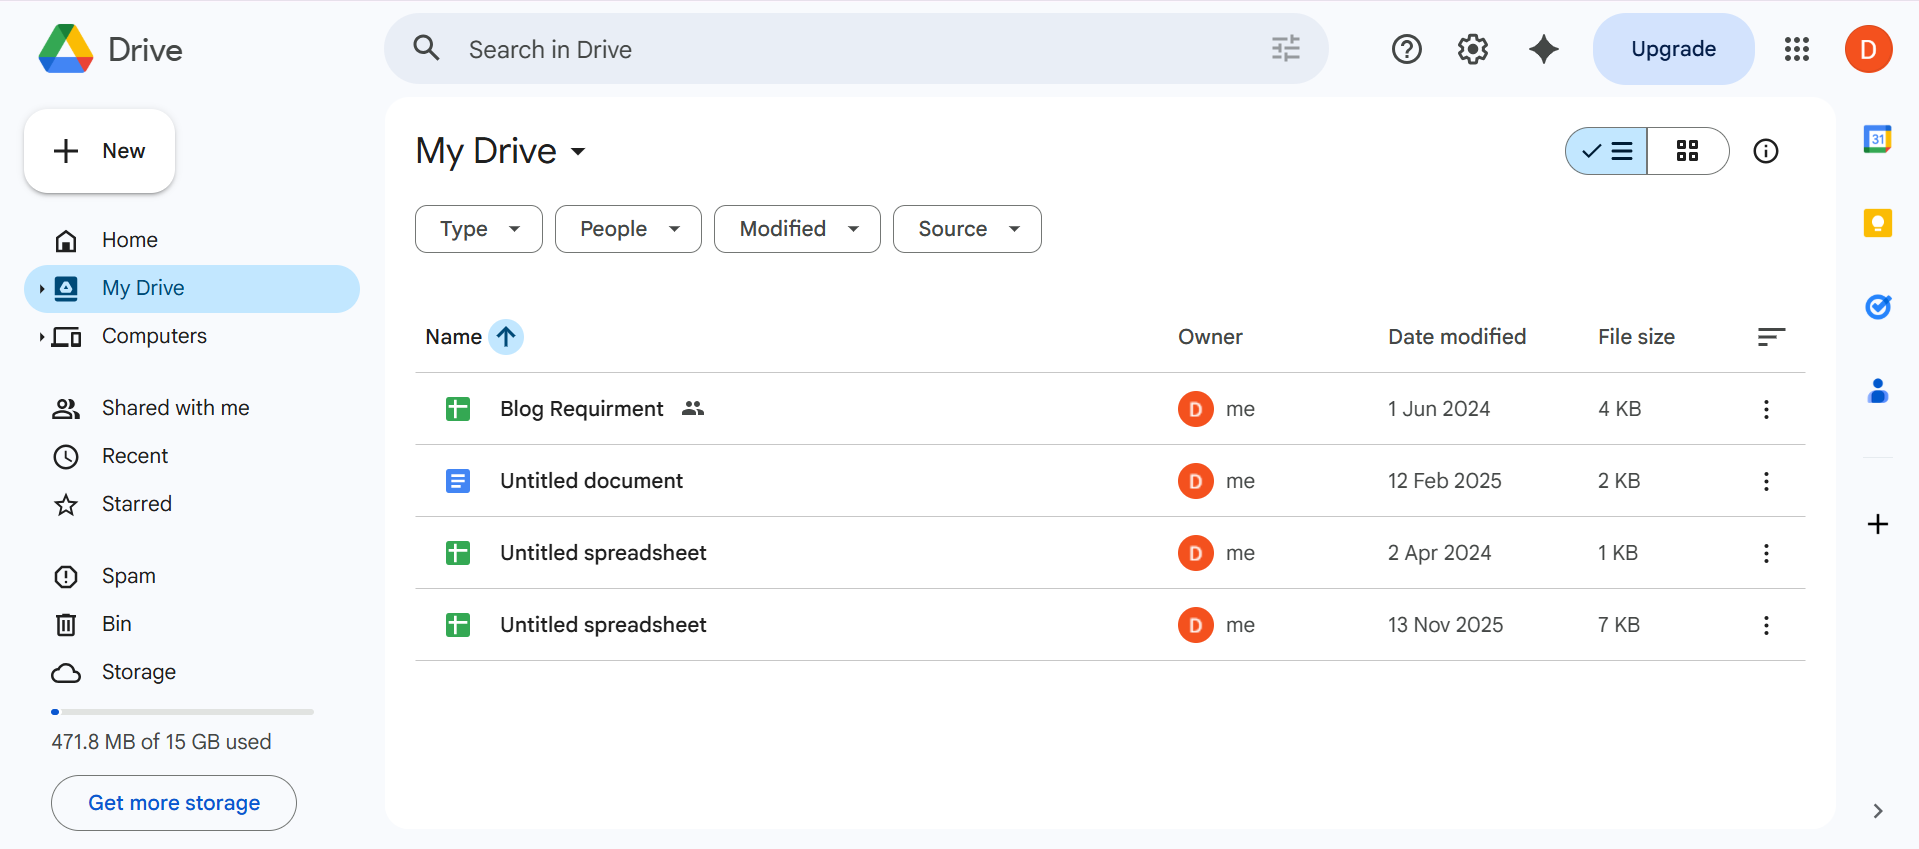
Step 1: Open Google Chrome and go to drive.google.com. Sign in with your Google account if prompted.
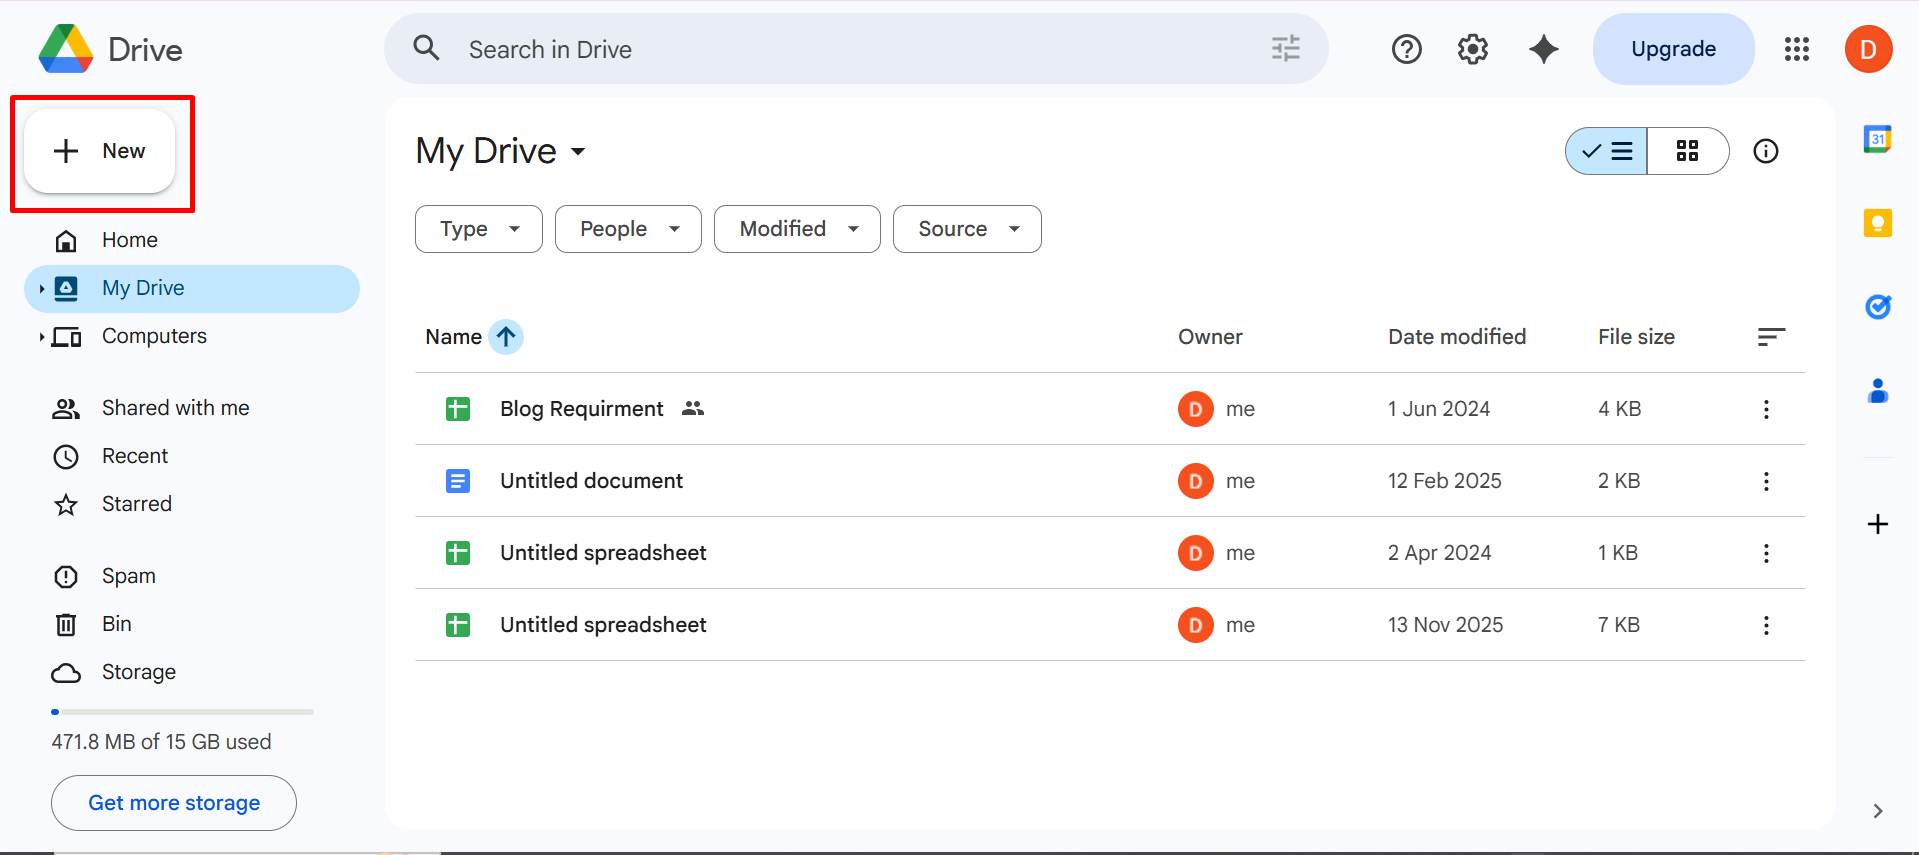
Step 2: Click the "+ New" button in the top-left corner.
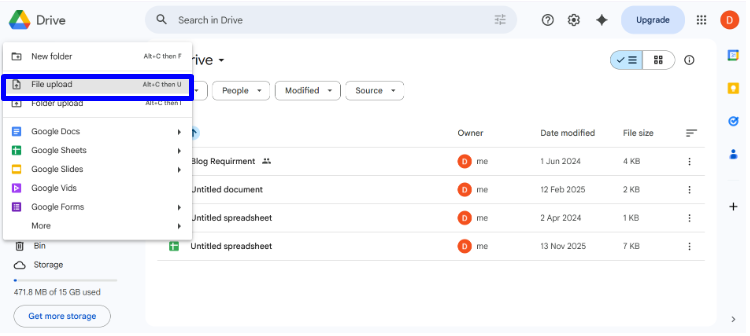
Step 3: Click "File Upload" from the dropdown.
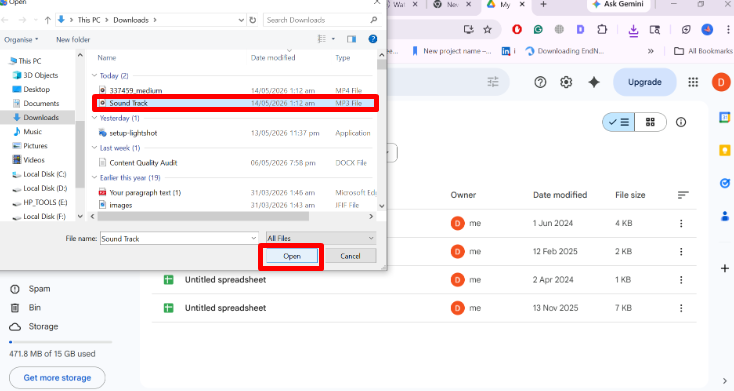
Step 4: Find your audio file (MP3 or WAV). Click it once to select it, then click Open.
Step 5: Wait for the upload progress bar to complete. It appears in the bottom-right of your screen.
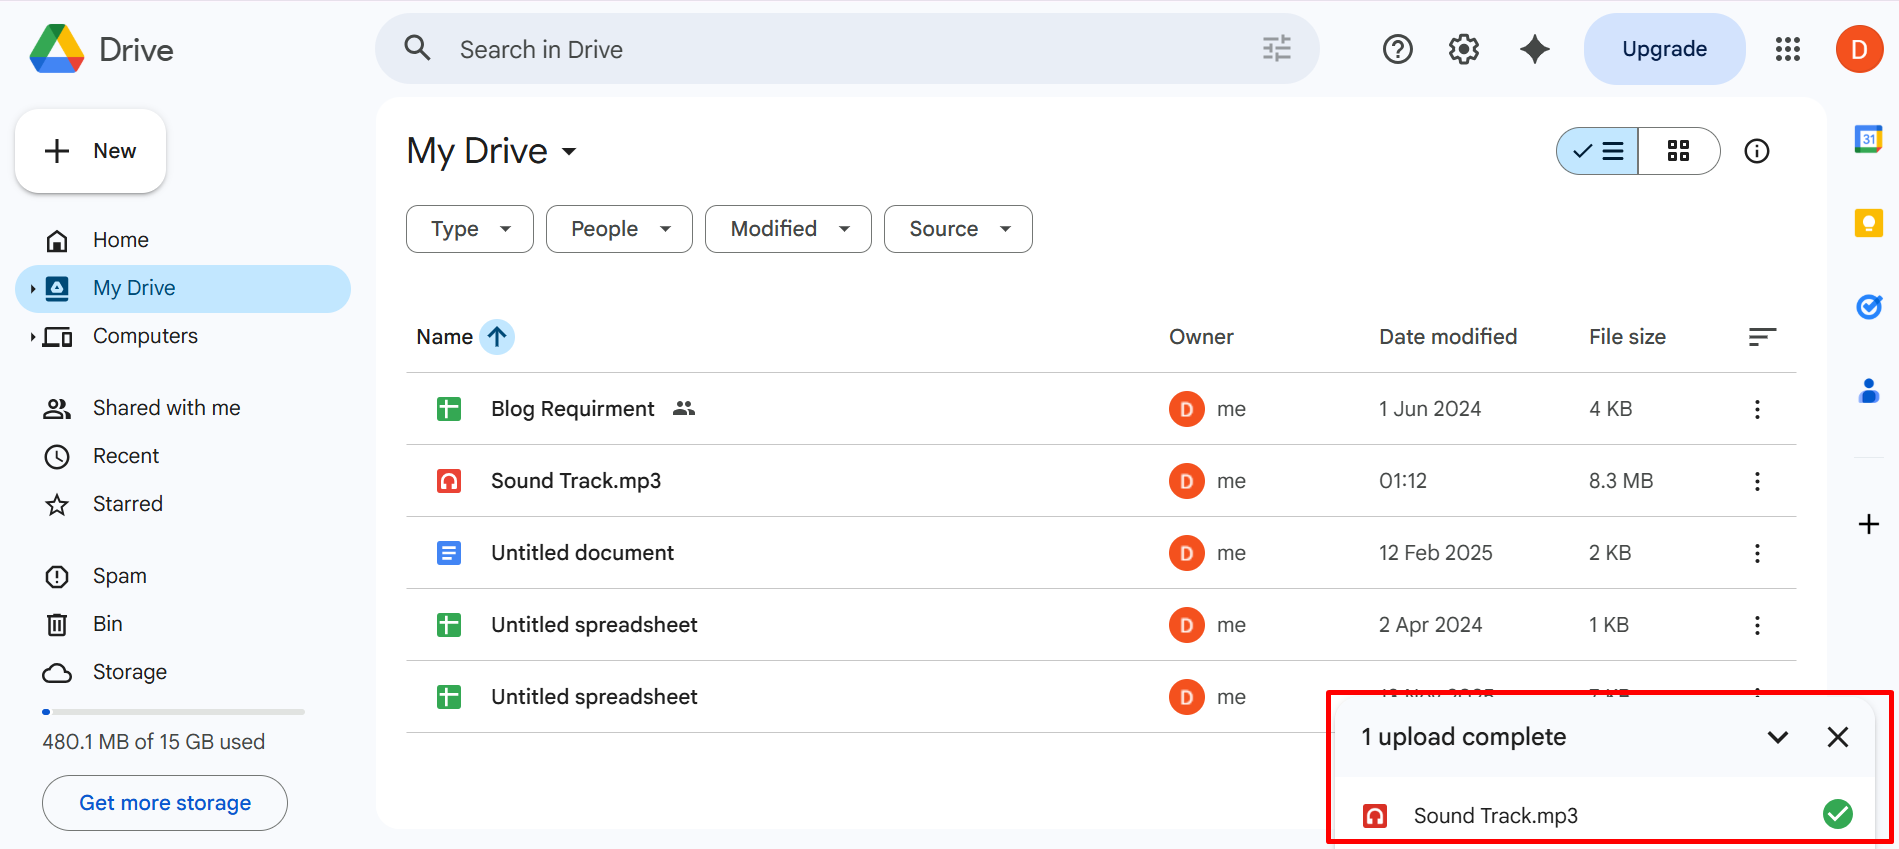
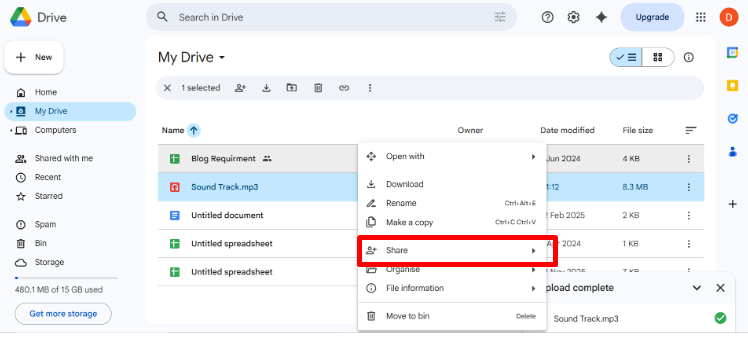
Step 6: Right-click on your uploaded file. Click Share from the menu that appears.
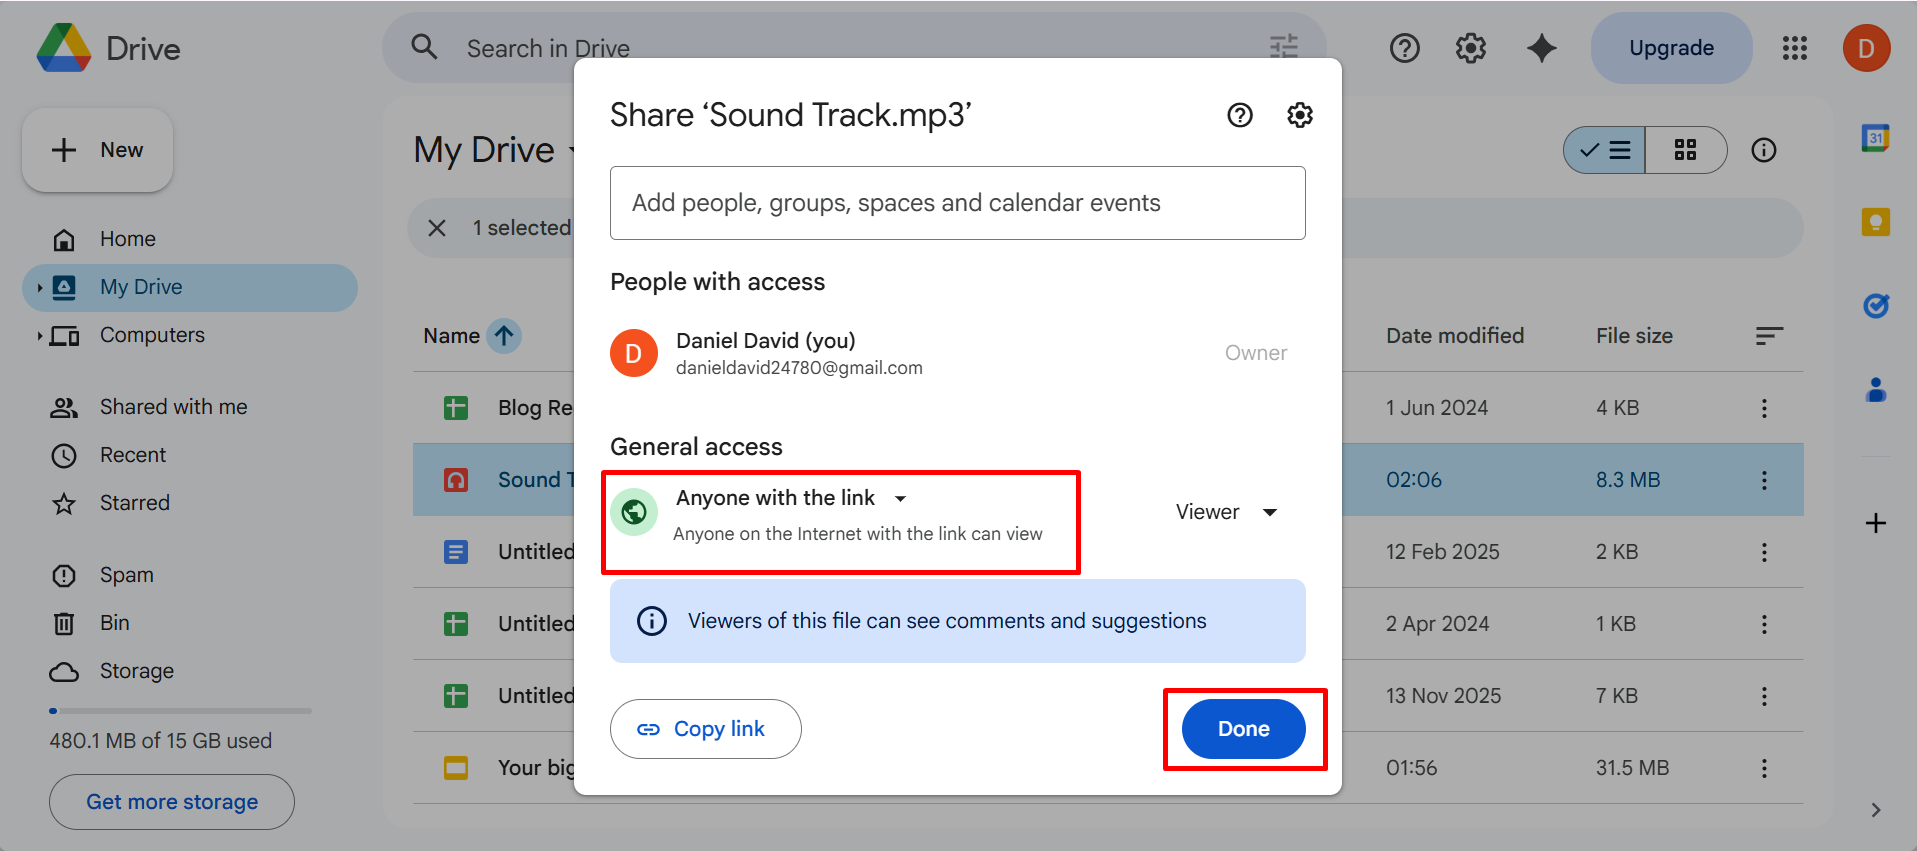
Step 7: Click the "Restricted" dropdown. Select "Anyone with the link." Click Done.
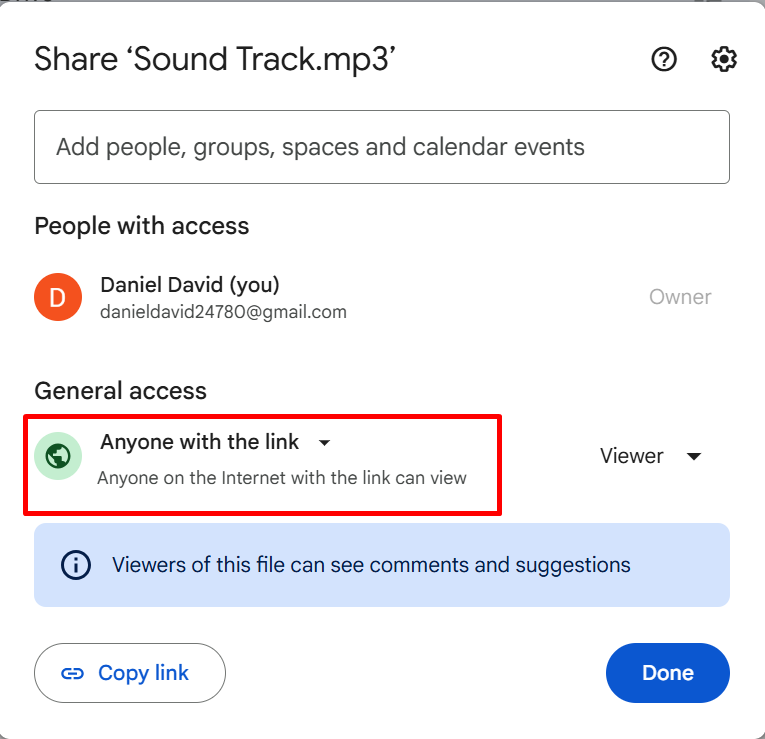
CRITICAL: WHY STEP 7 IS NOT OPTIONAL:
Google Slides streams audio directly from your Drive file. When you share your presentation with anyone, they need access to that Drive file separately from the presentation itself.
If the Drive file stays Restricted:
- You hear audio perfectly (you own the file)
- Everyone else hears silence.
Always change sharing to "Anyone with the link" before presenting or sharing with others.
HOW TO VERIFY IT WORKS:
After setting permissions, open your presentation link in a private/incognito browser window and play the slide as if you are a viewer. If audio plays, you are done. If it asks for access, return to Step 7.
Phase 2: Insert Audio from Google Drive into Google Slides
Step 1: Open Google Chrome and go to slides.google.com. Click on your presentation to open it. Click on the exact slide where you want audio.
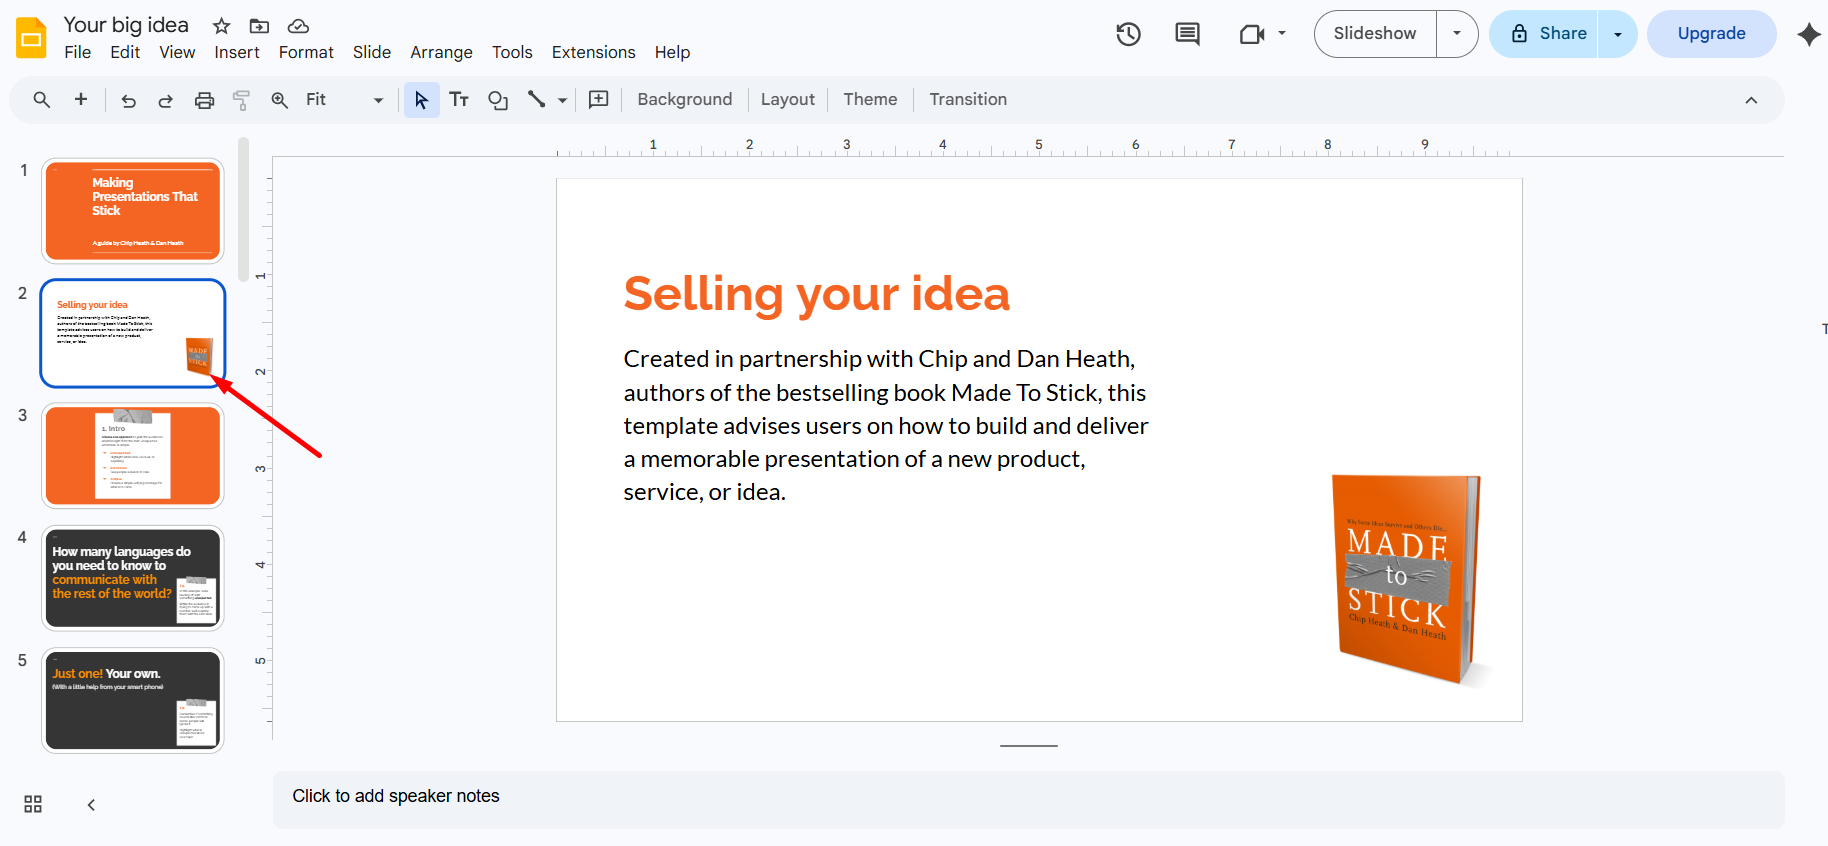
Step 2: Click "Insert" in the top menu bar.
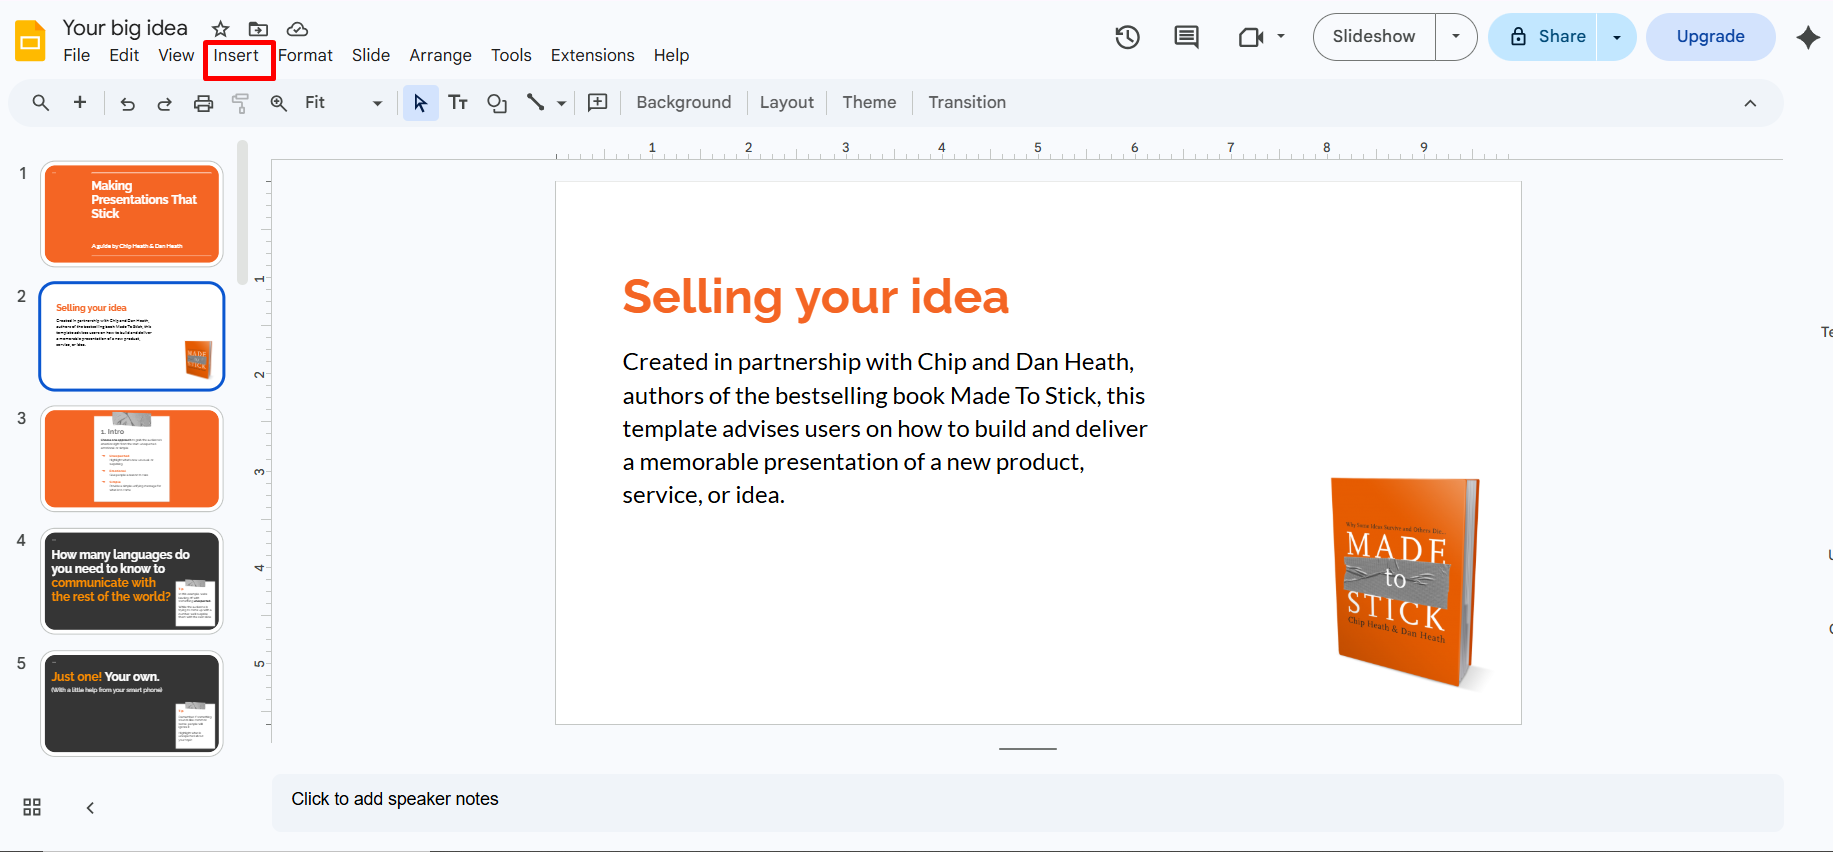
Step 3: Click "Audio" from the dropdown.

CANNOT SEE "AUDIO" IN THE INSERT MENU?
- You are using the Google Slides mobile app. Audio insertion requires a browser, not the app. Solution: Open slides.google.com in Chrome.
- You are not signed into your Google account. Solution: Sign in at google.com first.
Step 4: The Insert Audio window opens. Click the My Drive tab if it is not already selected.
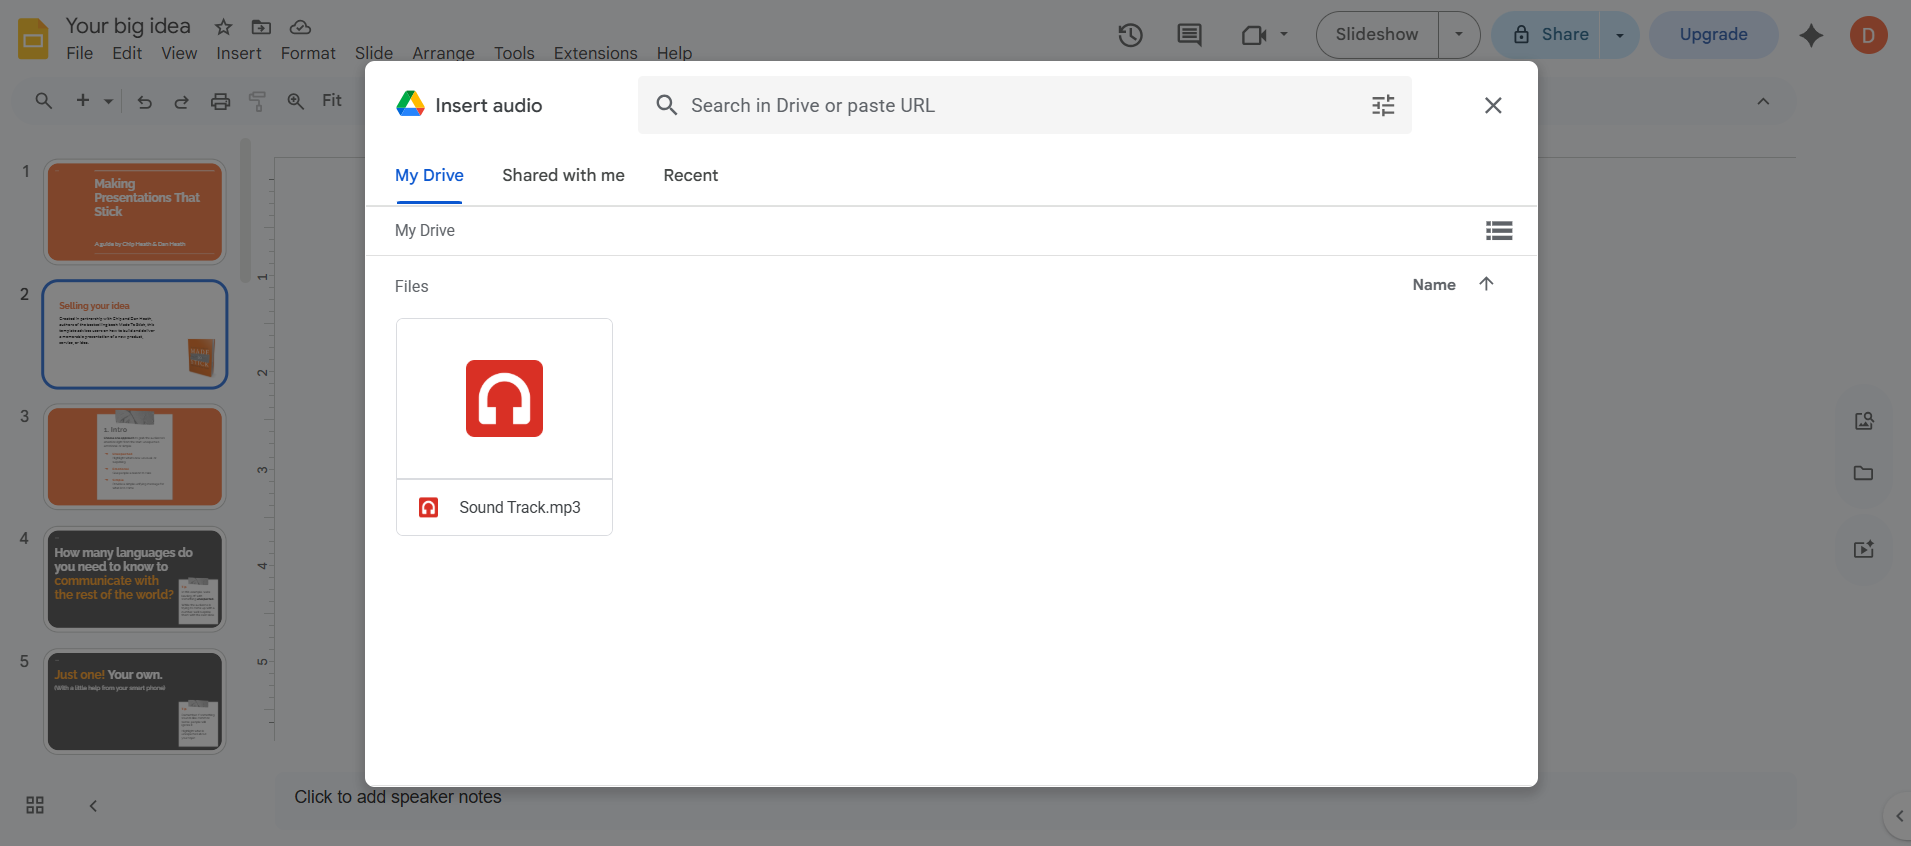
Step 5: Find your audio file in the list. Use the search bar at the top if you have many files.
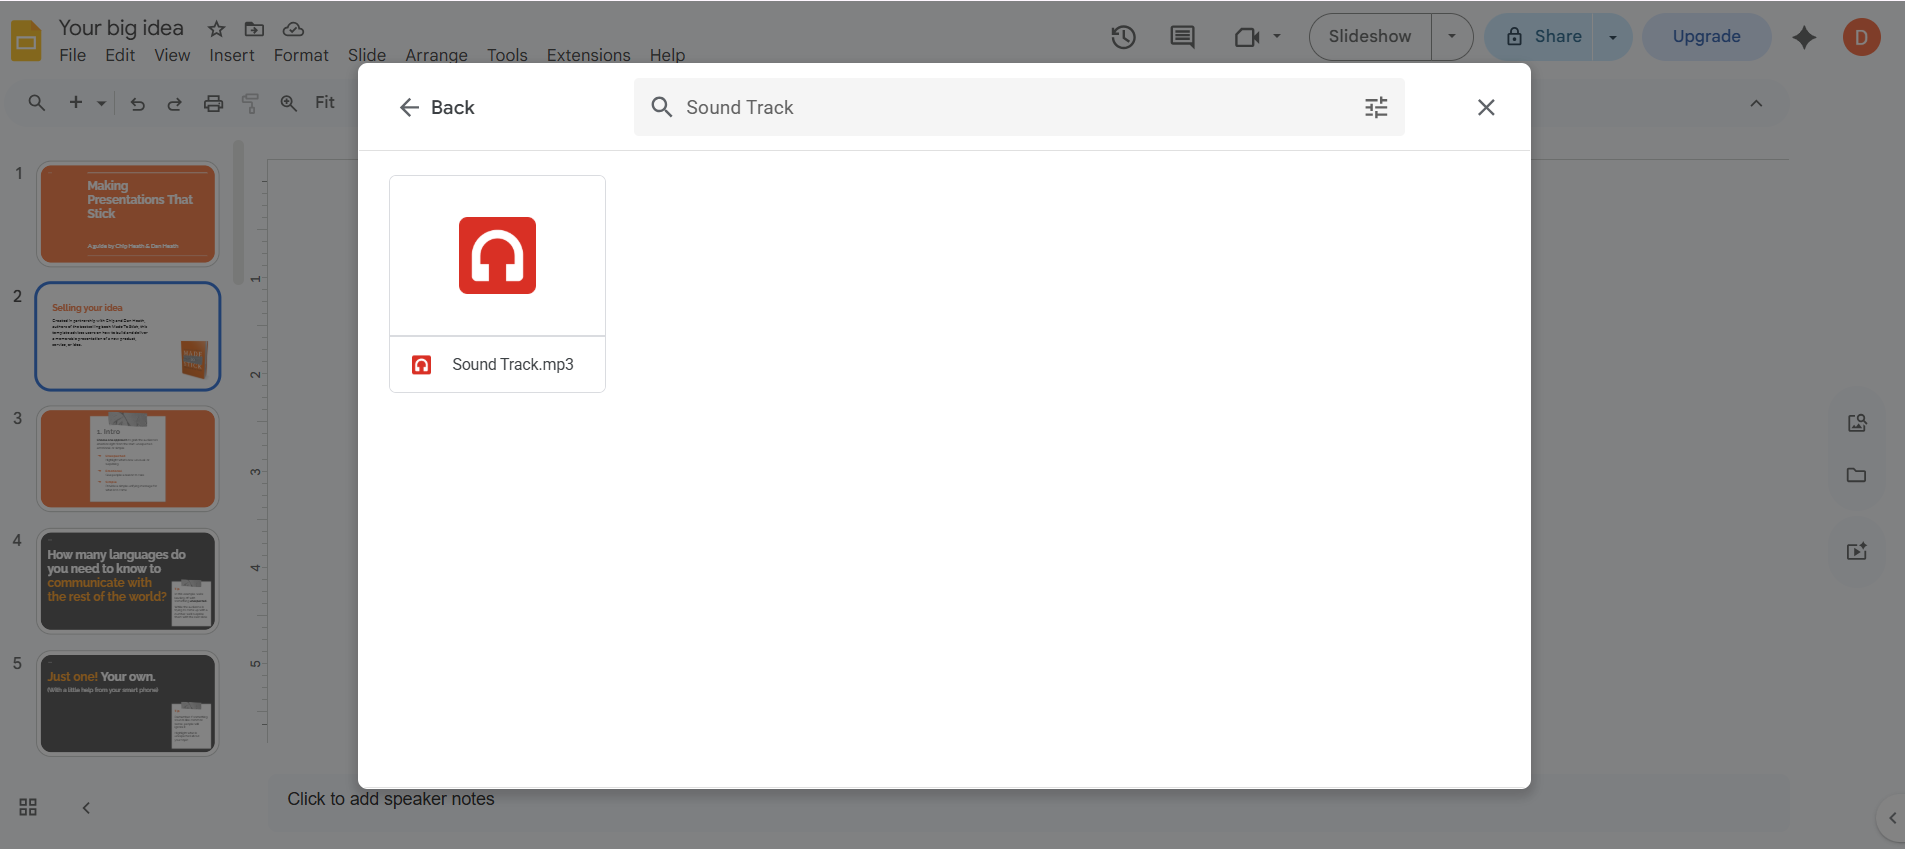
Step 6: Click once on your audio file to select it. Click the blue Select button.
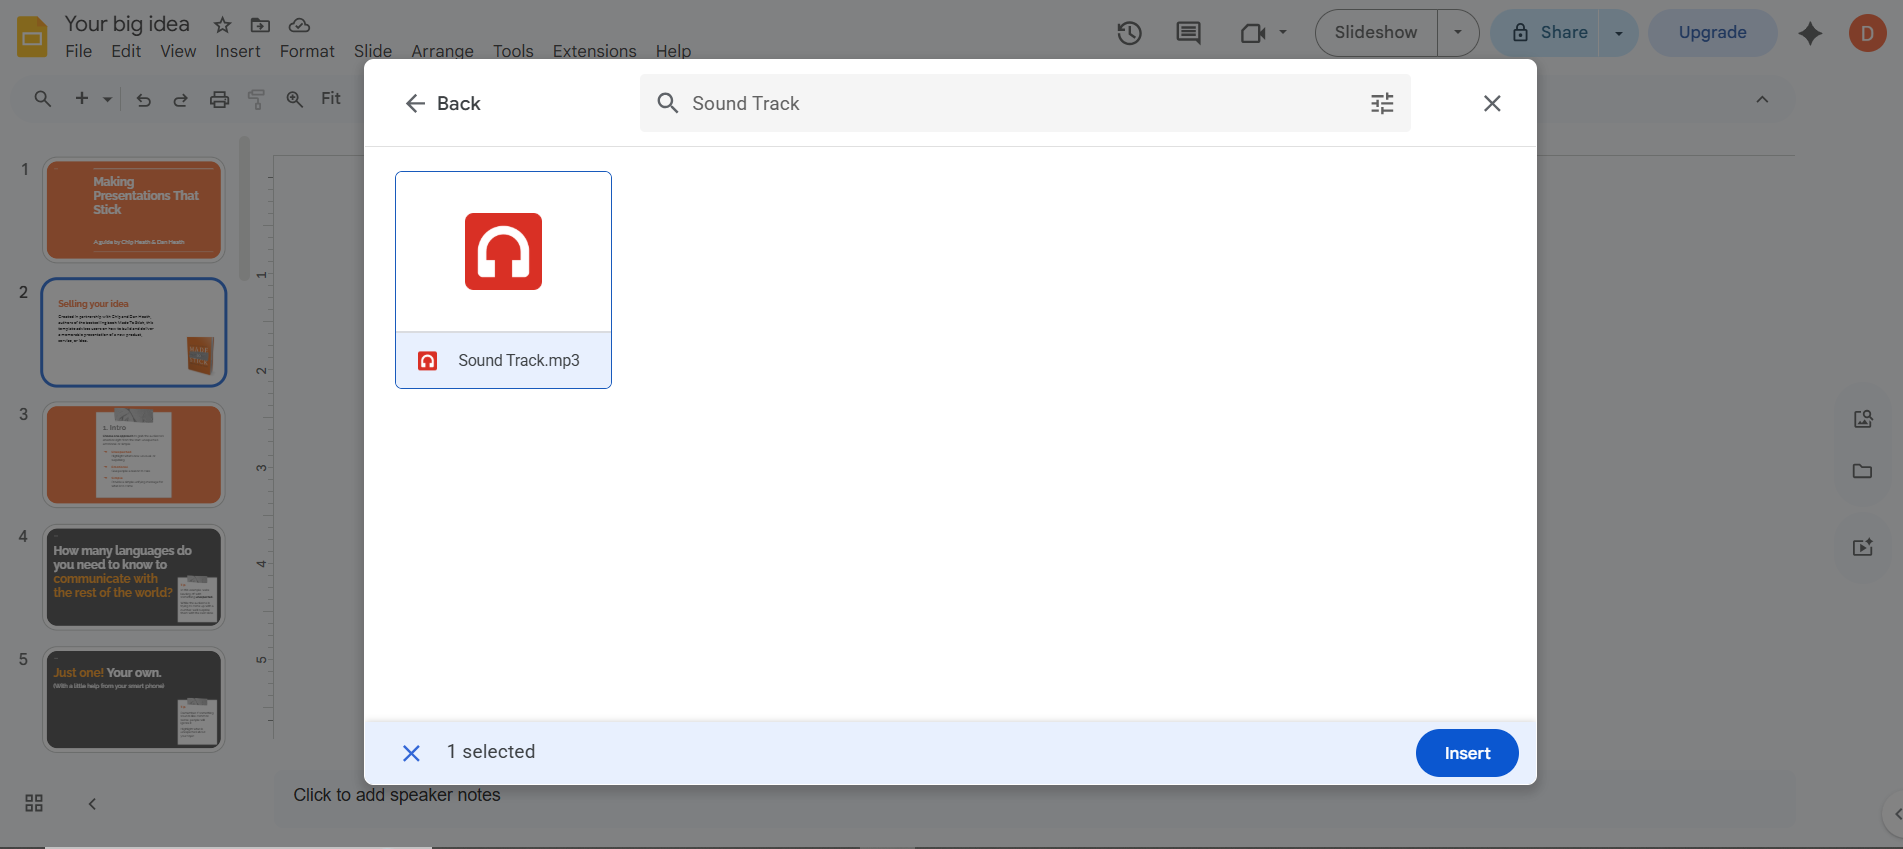
Step 7: A speaker icon appears on your slide. Drag it to move it anywhere on the slide.
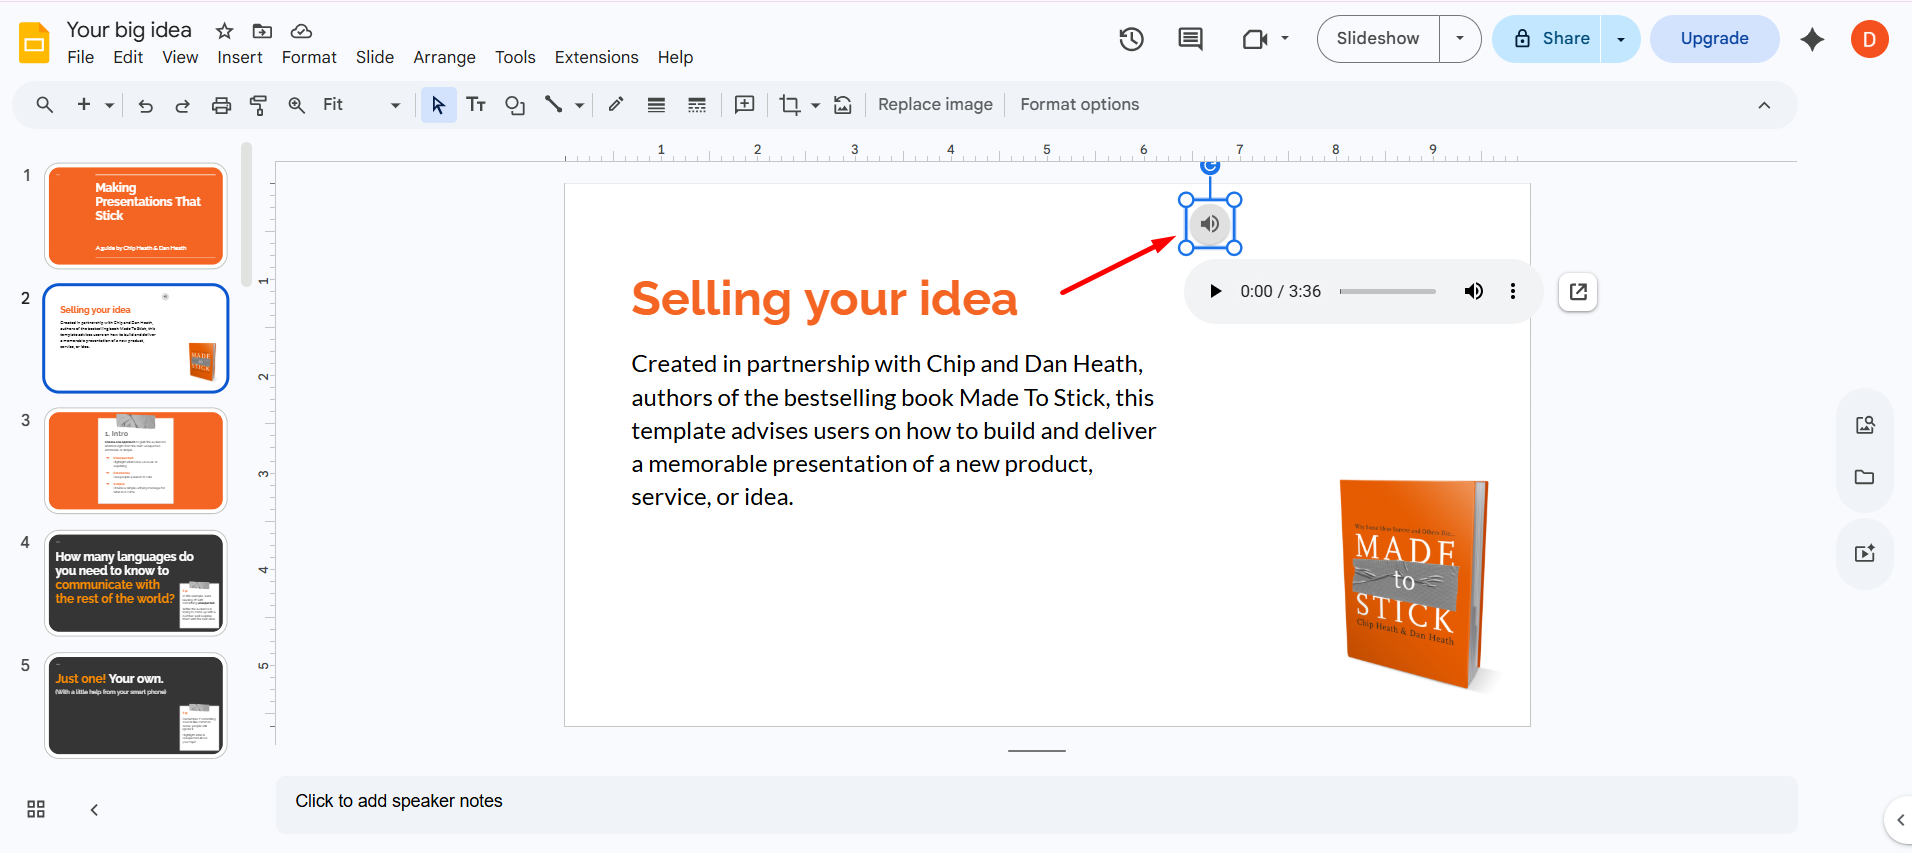
Step 8: Click anywhere else on the slide to confirm. Your audio is now successfully added.
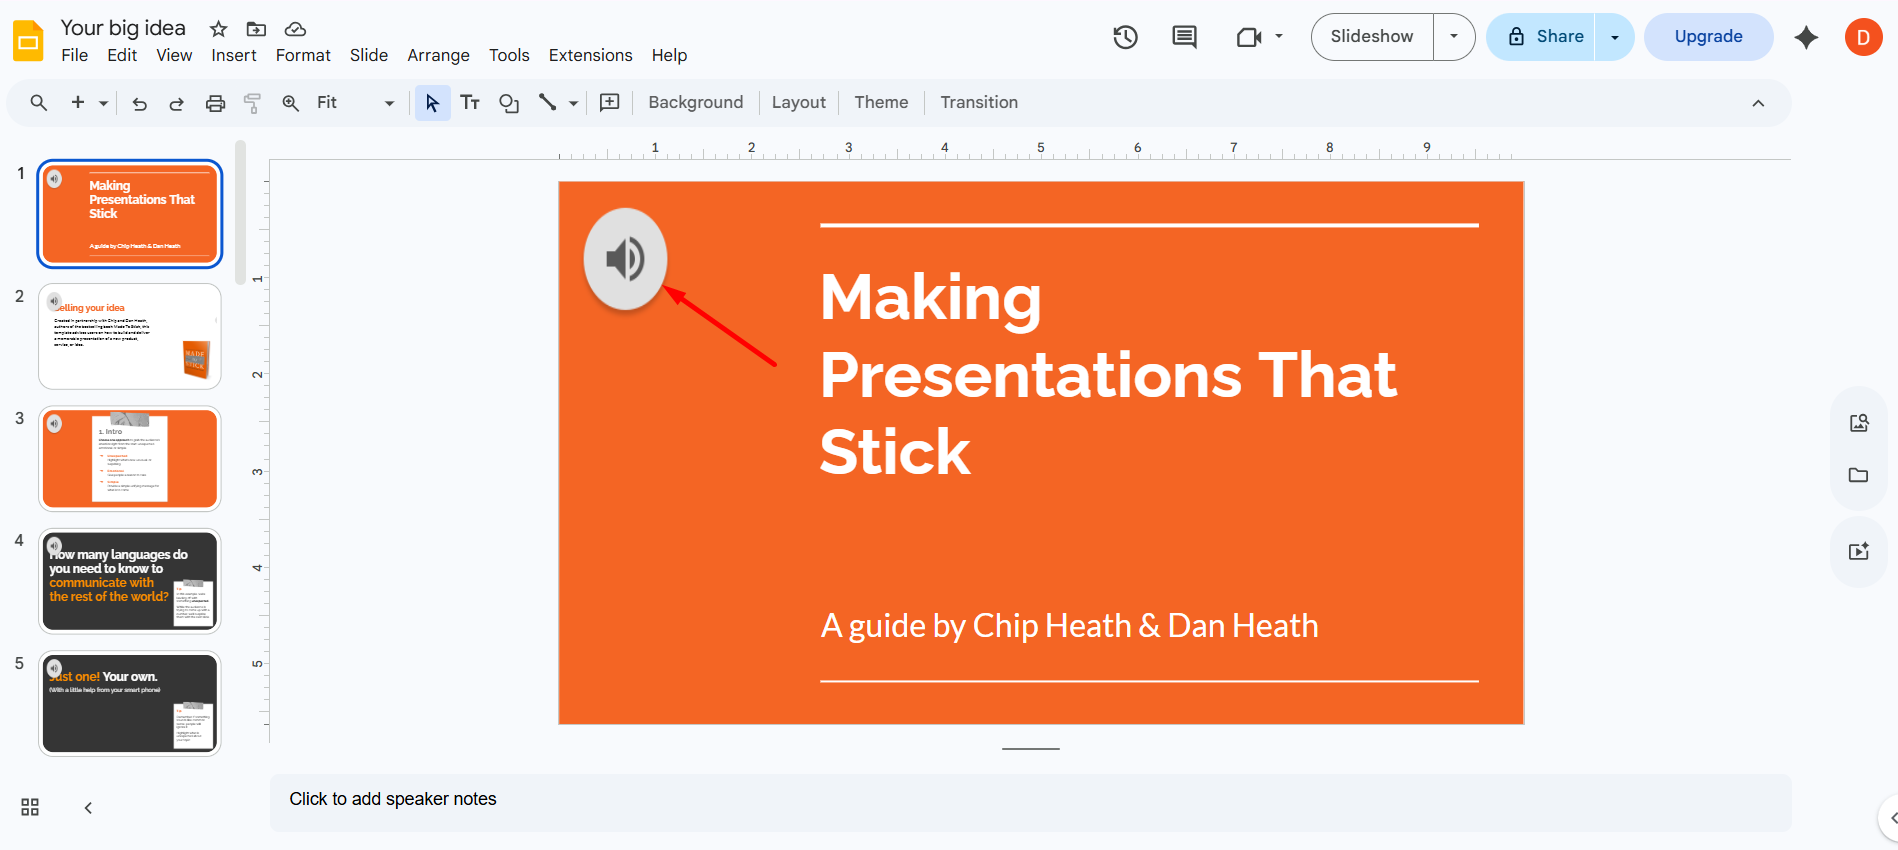
What to Expect After Adding Audio
- The speaker icon means your audio file is linked to this slide. The icon does not mean the audio is embedded in the file. It is always streaming from Google Drive.
- Hover over the icon in edit mode, and a mini play button appears. Click it to test your audio before presenting.
- In Presentation mode, audio plays based on your Format Options settings (on click or automatically).
- You can drag the icon to the edge of the slide so it is invisible during the presentation. Audio still plays even when the icon is hidden or partially off the slide.
Pro Tip: Before your actual presentation, enter Present mode and click to the slide with audio. Play it once, then restart. This pre-loads the audio file from Drive and prevents buffering delays or a pause before it begins.
Quick Step-by-Step Summary:
Method 2: Direct Upload from Your Device
AVAILABILITY NOTE: This option appeared in Google Slides in 2025 and is available on most accounts in 2026. If you do not see it, use Method 1 above.
Step 1: Open your presentation in Google Slides (browser only). Click the slide where you want audio.
Step 2: Click Insert → Audio → Audio (select "Audio", NOT "Audio from Google Drive").
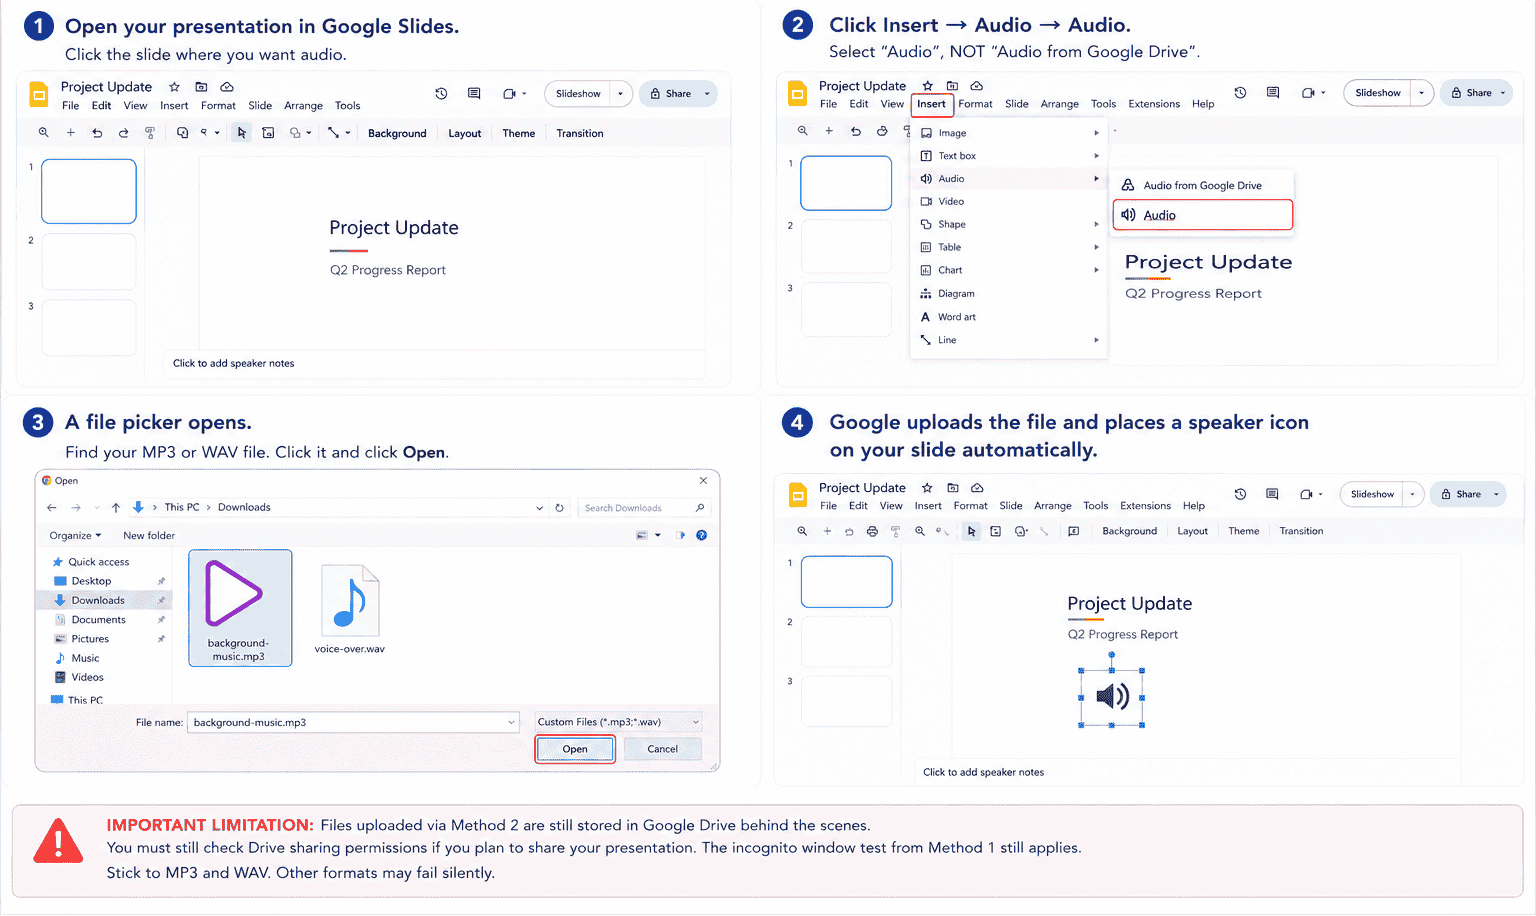
Step 3: A file picker opens. Find your MP3 or WAV file. Click it and click Open.
Step 4: Google uploads the file and places a speaker icon on your slide automatically.
IMPORTANT LIMITATION: Files uploaded via Method 2 are still stored in Google Drive behind the scenes. You must still check Drive sharing permissions if you plan to share your presentation. Stick to MP3 and WAV — other formats may fail silently.
How to Add Audio to Multiple Slides in Google Slides
There are two completely different use cases here. Background music that plays continuously, and per-slide narration where each slide has its own audio. The setup for each is different.
Continuous Background Music Across All Slides
Step 1: Add audio to your first slide only
Step 2: Click the audio icon → click Format options in the toolbar
Step 3: Under Audio playback:
- Set Start playing to: Automatically
- UNCHECK "Stop on slide change"
- CHECK "Loop audio" only if your audio track is shorter than your full presentation.

AUTOPLAY CAVEAT: Chrome may wait for a user interaction before starting audio, even when set to Automatically. Click once on the slide or anywhere on the screen at the start of your presentation to unlock audio. This is a Chrome browser policy, not a bug.
TEST THIS BEFORE YOU PRESENT: Run through the full presentation in Present mode once before your actual presentation. Confirm audio continues across slides and does not stutter. Large files can buffer on slower internet connections.
For timing, looping, and the best royalty-free background music sources, see our dedicated guide on adding music to Google Slides.
Different Narration Audio on Each Individual Slide
Step 1: Go to each slide individually
Step 2: Add a separate audio file to each slide using Method 1 or 2
Step 3: For each audio file: click the icon → Format options → set Start playing to Automatically → CHECK "Stop on slide change"
Step 4: Each slide plays its own audio, then stops automatically when you advance to the next slide

TIP: Name your audio files by slide number before uploading to Drive — "slide-01-intro.mp3", "slide-02-data.mp3", etc. This prevents inserting the wrong narration on the wrong slide.
Google Slides Audio Playback Settings Explained
Every audio setting lives in the Format options panel. Here is how to open it:
Step 1: Click on the audio icon on your slide
Step 2: Click "Format options" in the toolbar above OR right-click the audio icon → Format options
Step 3: The Format options panel opens on the RIGHT side
Step 4: Scroll to "Audio playback", click to expand if collapsed
QUICK SETTINGS GUIDE BY USE CASE:
Background Music (plays across all slides):
- Start playing: Automatically
- Stop on slide change: OFF (unchecked)
- Loop audio: ON if track is shorter than presentation
- Hide icon: ON (cleaner look)
Note: Plan one click at the start of the presentation to unlock Chrome autoplay
Per-Slide Narration / Voiceover:
- Start playing: Automatically
- Stop on slide change: ON (checked)
- Loop audio: OFF
- Hide icon: ON
Sound Effect (click-triggered):
- Start playing: On click
- Stop on slide change: ON (checked)
- Loop audio: OFF
- Hide icon: OFF (viewers must see icon to click it)
How to Add Audio to Google Slides on Different Devices
On Windows PC or Mac
Windows PC and Mac fully support adding audio to Google Slides. Every feature in this guide works exactly as described.
- Use Google Chrome browser for the most reliable experience
- Go to slides.google.com and follow the steps above
- Firefox and Edge work, but Chrome is most reliable for media
- Safari on Mac works but has stricter autoplay behavior. Audio set to Automatically may require a click to start
On a Chromebook
Chromebook runs Chrome browser natively with full feature access. Follow the exact steps from above. No workarounds needed.
For recording audio on Chromebook: Go to Online Voice Recorder in Chrome → Record directly in the browser → save as MP3 → Upload to Google Drive → insert per Section 2.
On iPhone or iPad
LIMITATION: The Google Slides iOS app does NOT support audio insertion. It's not a device bug, but a confirmed Google limitation in 2026.
Workaround 1 (Best):
Step 1: Open Safari on your iPad or iPhone
Step 2: Go to slides.google.com
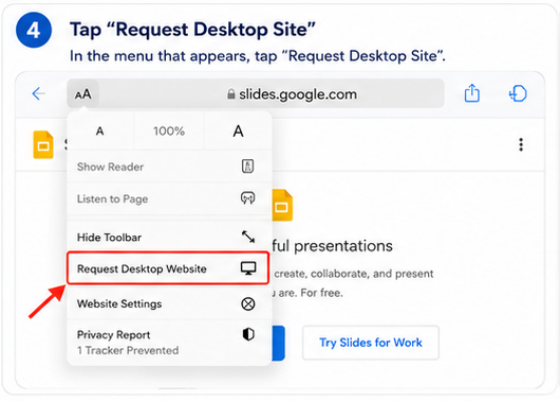
Step 3: Tap the AA icon in the Safari address bar
Step 4: Tap "Request Desktop Site"
Step 5: Google Slides loads as the full desktop version
Step 6: Follow all steps from Section 2 above
Workaround 2: Add audio using a desktop or Chromebook. Open the presentation on iPad for viewing and presenting. Audio added on desktop plays correctly in the iOS app.
On Android Phone or Tablet
The Google Slides Android app also does NOT support audio insertion.
Workaround 1 (Best):
Step 1: Open Google Chrome on your Android device
Step 2: Go to slides.google.com
Step 3: Tap the three-dot menu in the top-right corner
Step 4: Tap "Desktop site" to check it on
Step 5: Page reloads as the full desktop version
Step 6: Follow Section 2 steps. Use landscape mode for a larger screen area
Workaround 2: Add audio on desktop or Chromebook. Audio plays correctly when presenting from Android app.
Best Free Audio and Music for Google Slides (No Copyright)
Before adding audio, you need a file, and it must be royalty-free if you are presenting publicly or posting recordings online.
FREE MUSIC (Royalty-Free, Safe for Presentations):
- YouTube Audio Library: Massive library, download as MP3, completely free
- Pixabay Music: No account needed, no copyright, all genres
- Free Music Archive (freemusicarchive.org): Curated library across every genre
- Bensound (bensound.com): Professional quality, free with attribution note
- ccMixter (ccmixter.org): Creative Commons music from independent artists
FREE SOUND EFFECTS:
- Freesound: Massive community database, all sound types
- Zapsplat (zapsplat.com): Professional SFX library, free with an account
- Mixkit (mixkit.co/free-sound-effects): Clean professional effects, no attribution needed
COPYRIGHT WARNING: Never use songs from Spotify, Apple Music, YouTube Music, or any commercial streaming service in presentations. Even for school or classroom use, this can violate copyright law. The free sources above are 100% safe. Stick to royalty-free or Creative Commons licensed audio.
Troubleshooting Audio Problems in Google Slides
Audio Option Not Showing in Insert Menu
CAUSE: Using the mobile app or a non-standard browser session
EXACT FIX:
Step 1: Close the Google Slides app completely
Step 2: Open Google Chrome browser on your device
Step 3: Go to slides.google.com
Step 4: Sign in and open your presentation
Step 5: Click Insert — Audio now appears in the menu
Insert > Audio ONLY works in a web browser. It does not exist in the iOS or Android Google Slides app.
Audio Plays for Me But Not for Shared Viewers
CAUSE: Your Google Drive audio file sharing is "Restricted". This is the single most common audio problem in Google Slides.
EXACT FIX:
Step 1: Go to drive.google.com
Step 2: Find your audio file
Step 3: Right-click it → click Share
Step 4: Click the "Restricted" dropdown
Step 5: Select "Anyone with the link"
Step 6: Click Done
VERIFY THE FIX: Open your presentation link in an incognito/private browser window and present the slide with audio. If you hear it, your viewers will too. If it asks for permission, repeat Steps 3–6.
Audio Set to Autoplay Does Not Start
CAUSE: Chrome's autoplay policy blocks unmuted audio from playing automatically until the user has clicked somewhere on the page.
EXACT FIX (choose one):
- Option A: Click once anywhere on the slide when the presentation starts to unlock audio.
- Option B: Change the playback setting to "On click" so the audio icon is visible: click audio icon → Format options → Start playing → On click → uncheck Hide icon.
- Option C: For shared kiosk presentations, test on the exact device and browser before your event.
Audio Plays in Edit Mode But Not in Presentation Mode
CAUSE: Playback is set to "On click," but the audio icon is hidden, so viewers see no icon to click.
EXACT FIX:
Step 1: In edit mode, click the audio icon on your slide
Step 2: Click Format options in the toolbar
Step 3: Under "Start playing" confirm it is set to Automatically
Step 4: If you need On click, uncheck "Hide icon when presenting" so viewers can see the icon to click
Step 5: Test in Present mode
Audio Only Plays on the First Slide Then Stops
There are two possible causes:
CAUSE A: "Stop on slide change" is checked.
FIX: Click audio icon → Format options → Audio playback → UNCHECK "Stop on slide change"
CAUSE B: Chrome's autoplay policy blocked audio on subsequent slides after the first interaction.
FIX: Click once anywhere on the screen when each slide with audio loads, OR use Option B from the "Autoplay Does Not Start" fix above.

Cannot Upload Audio File
There are three causes and fixes:
- Wrong file format → Convert to MP3 at CloudConvert.com first
- File too large (over 100 MB) → Compress at MP3Smaller.com → set to 128kbps → Keep files under 20 MB to avoid buffering
- Google Drive storage full → Go to drive.google.com/settings → check storage → Delete unused files or upgrade Google One plan
Audio Is Playing But I Cannot Hear Anything
CHECK IN THIS ORDER:
Step 1: Device volume — is your device muted or at zero?
Step 2: Browser tab muted — right-click the Chrome tab at the top → If you see "Unmute site" — click it
Step 3: Format options volume — click audio icon → Format options → Volume is not set to Low
Step 4: External speakers — if presenting on a display via HDMI, check the display's own speaker volume
Presentation Gets Slow or Audio Stutters
CAUSE: Large audio file size causing buffering from Drive
EXACT FIX:
Step 1: Download your audio file from Drive
Step 2: Go to MP3Smaller.com → upload → set to 128kbps → compress
Step 3: Download the compressed file
Step 4: Delete the old audio file from Drive
Step 5: Upload the compressed version to Drive
Step 6: In Slides: delete the old audio icon from the slide
Step 7: Re-insert the new compressed file
Also, before presenting, hover over the audio icon in edit mode and click the mini play button to pre-buffer the file from Drive. Presentation will run significantly smoother.
Frequently Asked Questions — Audio in Google Slides
Quick Summary — How to Add Audio to Google Slides
METHOD 1 (Recommended — Via Google Drive):
- Upload audio (MP3 or WAV) to drive.google.com
- Set Drive file sharing to "Anyone with the link"
- Verify with the incognito window test
- Open Google Slides in Chrome browser
- Click Insert → Audio → Audio from Google Drive
- Select your file → click Select
- Position the speaker icon on your slide
- Set Format options (autoplay, loop, volume)
- Pre-play once in edit mode to preload before presenting
METHOD 2 (Quick — Direct Upload):
- Open Google Slides in Chrome browser
- Click Insert → Audio → Audio
- Select file from your device → Open
- Still verify Drive sharing permissions for viewers
Works on: Desktop ✓ | Chromebook ✓ | iPad via Safari ✓ | Android via Chrome Desktop Mode ✓
Does NOT work in: Google Slides mobile app (insert only)
Supported formats: MP3 ✓ | WAV ✓ | OGG: not officially confirmed — use MP3 instead
Not supported: AAC ✗ | M4A ✗ | WMA ✗ | FLAC ✗
Now you know exactly how to add audio to Google Slides, and why the Drive permissions step and the Chrome autoplay policy trip people up every time. If you create presentations regularly and want to skip the Drive upload workflow, try Slidey.io Free — Add Media Without the Friction →


.svg)