
Posted on:
May 26, 2026
How to Add Media to Google Slides
Learn how to add audio, video, GIFs, music & voiceovers to Google Slides. Step-by-step 2026 guide for all devices. Free tools included
How to Add Media to Google Slides: Audio, Video, Music, GIFs & More (Complete 2026 Guide)
Adding media in Google Slides sounds simple until you're 20 minutes before a presentation and your audio won't play, or your embedded video shows a blank screen. Sound familiar?
This guide covers everything you need to know about how to add media to Google Slides: audio, video, music, GIFs, voiceovers, drawings, and more. Whether you're a student, teacher, or professional, you'll find exact step-by-step instructions for every media type. Plus, we also added troubleshooting fixes for when things go wrong as a bonus.
We will cover audio and music (including autoplay and background music), embedding YouTube videos and uploading your own, inserting GIFs and images, drawing directly on Google Slides, recording voiceovers, device-specific instructions for Chromebook, iPad, and Android, a full file format reference, and fixes for the most common media problems.
Want to skip the manual steps? Slidey.io lets you build complete media-rich presentations in minutes. Otherwise, let's get into it. Use the table of contents below to jump to any section.
What Types of Media Can You Add to Google Slides?
Some of the supported file formats for Google Slides are audio files, videos, animated GIFs, drawings, vectors, and even adding background music and voiceovers. However, each of these works a little differently, and some have limitations most people don't know about.
For instance, audio needs to live in Google Drive before you can insert it, or GIFs only animate in Presentation mode. But don't worry, we will walk through each type in full detail in its dedicated section.
How to Add Audio to Google Slides
Basic functions in Google Slides are often just drag-and-drop. Audio is a bit different. That's why it's one of the most searched topics in Google Slides and for good reason. The process isn't as obvious at first. The audio file you want to add must be stored in Google Drive before you can add it to Google Slides. You can upload any audio directly from your desktop or browser into the slide, but uploading to Google Drive first is more reliable if you want to share.
For a complete walkthrough with screenshots and device-specific instructions, see our dedicated guide on how to add audio to Google Slides.
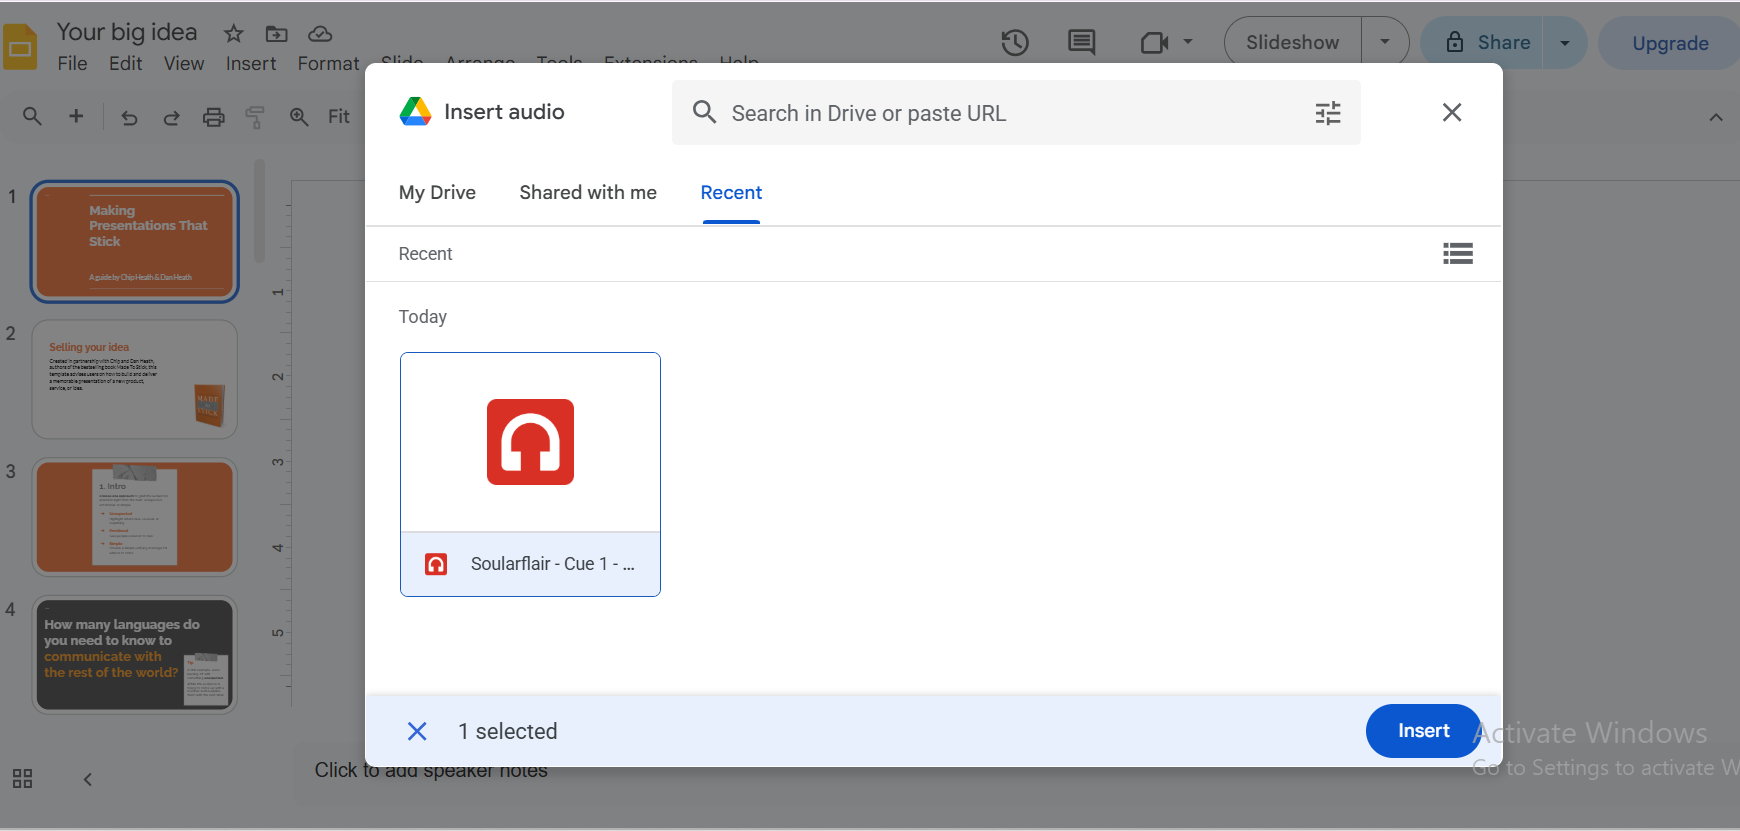
Step-by-Step: Add Audio from Google Drive
Step 1: Upload your audio file to Google Drive
Step 2: Open your Google Slides presentation
Step 3: Click on the slide where you want to add audio
Step 4: Go to the Insert menu in the top toolbar
Step 5: Click Audio from the dropdown menu
Step 6: Select the “My Drive” tab in the pop-up
Step 7: Find and select your audio file
Step 8: Click the Select button
Step 9: An audio icon will appear on your slide - drag and resize/reposition it as needed


Google Slides supports MP3 and WAV. It may support OGG audio formats, but it's not officially confirmed. For full format details, see Google's official audio support page.
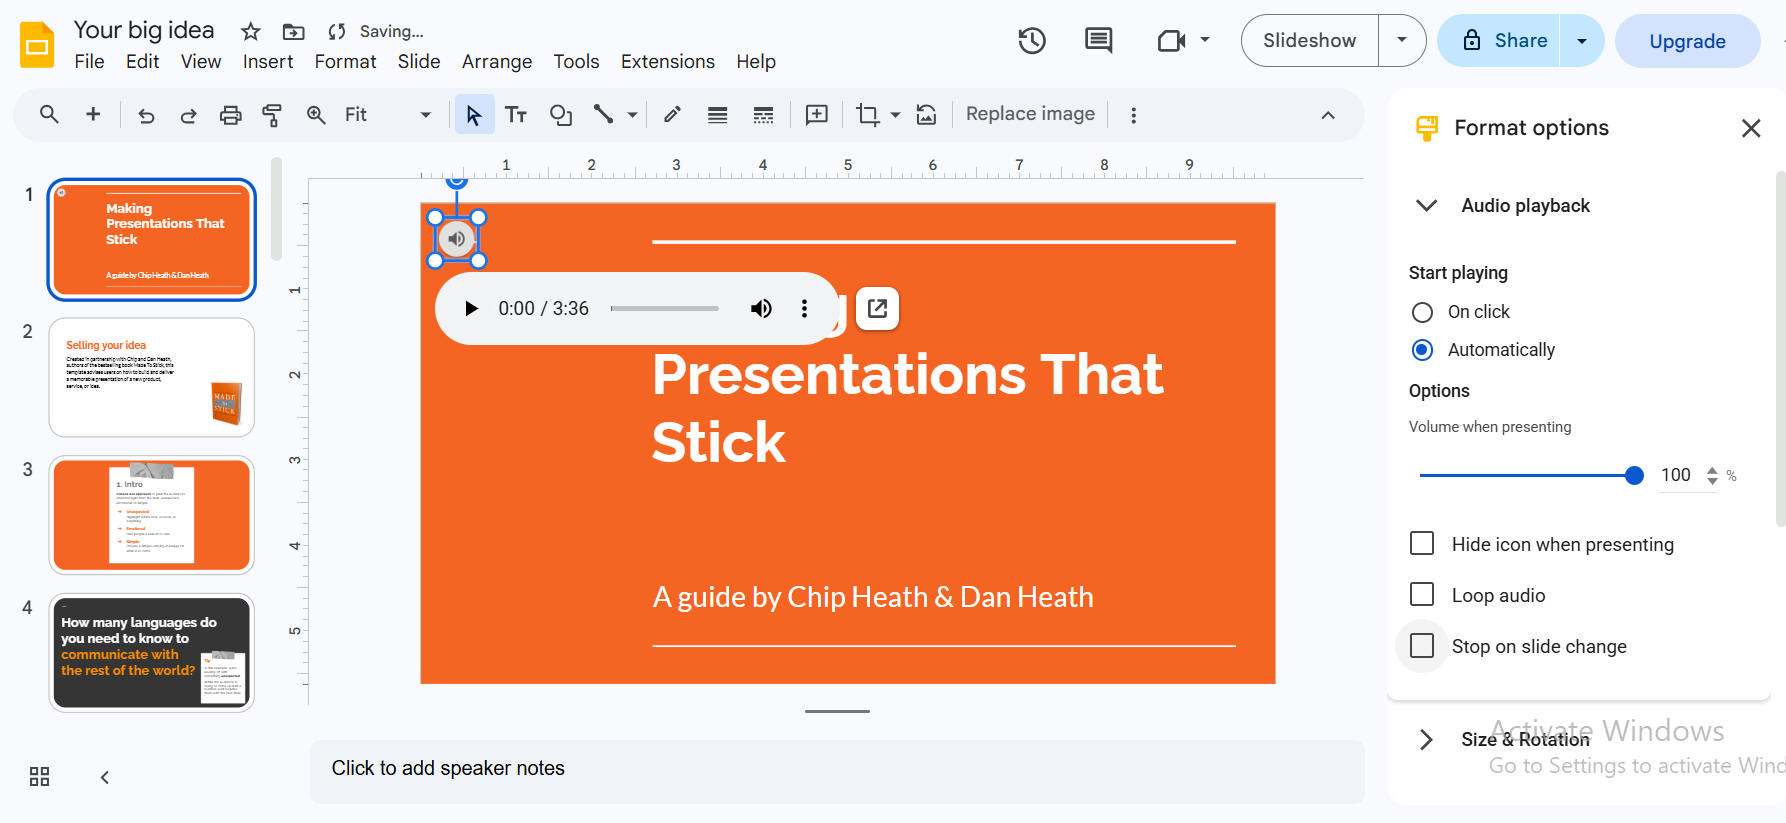
How to Make Audio Play Automatically
Audios don't play automatically in Google Slides by default. But you can enable this:
Step 1: Click on the audio icon on your slide
Step 2: Click Format options in the toolbar (or right-click > Format options)
Step 3: Under the Audio playback section, select "Automatically"
Step 4: Check "Loop audio" if you want it to repeat
Step 5: Check "Stop on slide change" if needed
Step 6: Close Format options panel

Chrome's autoplay policy may block audio from starting automatically until the viewer clicks somewhere on the slide. This is a browser behavior. Plan for one click at the start of your presentation to unlock audio.
How to Add Audio from Your Computer
Google Slides supports two methods to add audio from your computer. You can either add audio directly from your computer in Google Slides via Insert > Audio > Audio path. However, that method is not reliable for sharing. But don't worry, the workaround is quite simple.
- Go to drive.google.com
- Upload audio file (drag & drop or +New > File Upload)
- Wait for the upload to complete
- Return to Google Slides and follow the Google Drive method above
This is the step that trips up most people. Once your file is in Drive, adding it to a slide takes about 30 seconds. Still confused? Read our full guide on how to add audio to Google Slides for a complete walkthrough, including detailed instructions for Chromebook, iPad, and troubleshooting audio issues.
How to Add Music to Google Slides
Although music isn't different than audio, many people still get confused and often search how to add music to Google Slides. They assume adding music is a different process. Good news! It's not. You can add music to Google Slides using the same steps mentioned above for any other audio file.
However, there are certain nuances that you should know. For instance, playing background music across all slides, adding music from Spotify (don't worry, there's a trick), and managing music loops throughout your presentation. For complete music setup including background music across all slides, Spotify workarounds, and free music sources, see our dedicated guide on how to add music to Google Slides.
Background Music for Google Slides (Plays on All Slides)
Step 1: Add your music file to your first slide using the audio method above
Step 2: Click the audio icon and open Format options
Step 3: Set playback to Automatically
Step 4: Uncheck "Stop on slide change"
When you disable the "Stop on slide change", the music continues playing as you advance through your slides.
Free Music Sources for Google Slides Presentations
- YouTube Audio Library (free, no copyright restrictions, large library)
- Free Music Archive (freemusicarchive.org)
- Pixabay Music (pixabay.com/music)
- Bensound (bensound.com)
- ccMixter (ccmixter.org)
Can You Add Music to Google Slides from Spotify?
Unfortunately, no. Spotify's DRM prevents its audio from being downloaded or used in other applications. For all Spotify workarounds and legal alternatives, see our complete guide on how to add music to Google Slides.
How to Insert Audio into Google Slides (All Methods Compared)
How to Add a Video to Google Slides
There are two main methods: embedding a YouTube video or uploading your own video from Google Drive.
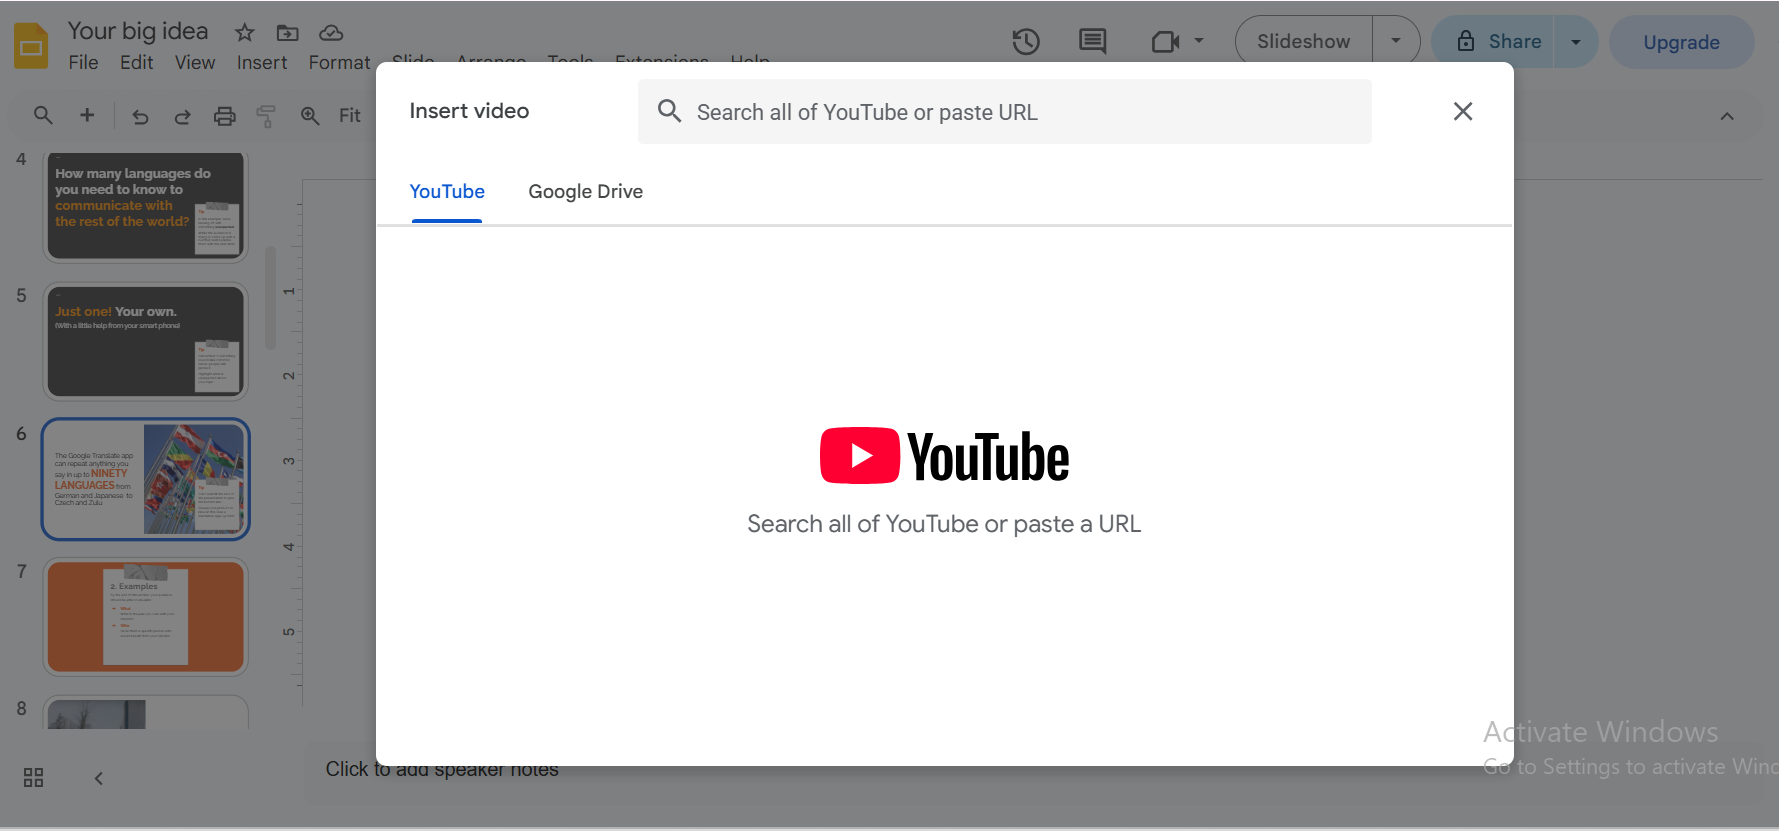
Method 1 — Add a YouTube Video to Google Slides
Step 1: Copy the YouTube video URL you want to embed
Step 2: Open Google Slides and click the slide you want to add the video to
Step 3: Click Insert in the top menu
Step 4: Select Video from the dropdown
Step 5: Select the By URL tab or Search YouTube to find it directly
Step 6: If using URL: paste the YouTube link and click Select
Step 7: The video thumbnail appears on your slide - drag to resize and position it
Step 8: Click the video, then click Video options to set autoplay, start/end time, and mute


Method 2 — Add a Video from Google Drive or Computer
Step 1: Upload your video to Google Drive if it's saved on your computer
Step 2: In Google Slides, go to Insert > Video
Step 3: Click the Google Drive tab
Step 4: Locate your video file and click Select
Important: Videos from Google Drive must be shared with viewers. Change the Drive file's sharing setting to "Anyone with the link can view".
Video Playback Settings (Autoplay, Mute, Loop)
Once the video is embedded on your Google Slides, click it. It'll open Video Playback Settings. There, you can access the following controls:
- Autoplay when presenting — video starts as soon as the slide appears
- Mute audio — video plays silently
- Loop video — repeats automatically
- Set start time — skip the video intro
- Set end time — stop before the video ends
Common Video Problems and Fixes
- Black screen: Refresh the presentation, or switch to Chrome browser
- Video won't load: Check your internet connection and Drive sharing permissions
- No sound: Unmute in Video options and check your system volume
- Video too slow or choppy: Compress the video file before uploading (HandBrake is a free tool)
- Can't find YouTube video via search: Use the direct URL tab instead
For a full walkthrough, see our complete guide on how to add a video to Google Slides.
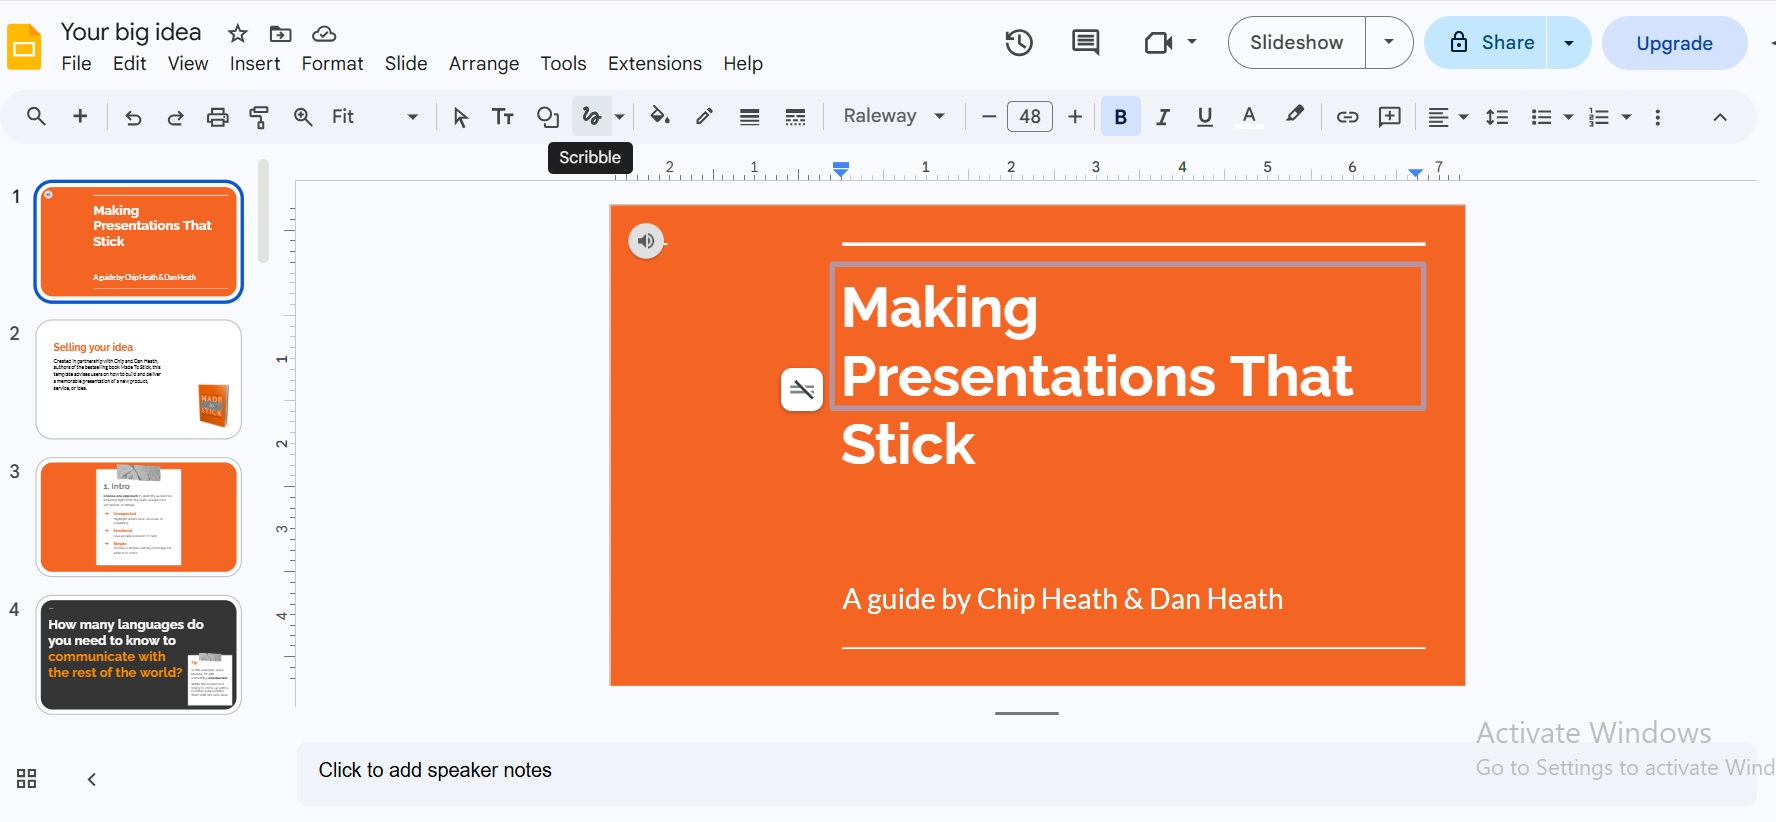
How to Draw on Google Slides
Not all media comes from external files. Google Slides has a built-in drawing tool called Scribble that allows freehand drawing directly on any slide. It lets you annotate, sketch, or draw freehand. It's simple but useful, especially for teachers, explainer presentations, or anyone who wants to add a personal touch.
Using the Scribble Tool in Google Slides
Step 1: Open your Google Slides presentation
Step 2: Click Insert in the top menu
Step 3: Click Line from the dropdown
Step 4: Select the Scribble tool
Step 5: Click and drag on your slide to draw freely

How to Draw Shapes and Lines
You don't need the Scribble tool for basic symbols. Add straight lines, arrows, curves, and basic shapes via Insert > Line or Insert > Shape. These are more precise than freehand drawing and snap to the grid for clean results.
Limitations of Drawing in Google Slides
Although the Scribble tool is very useful, nothing is perfect. There are a few limitations that you must know:
- No pressure sensitivity (line thickness stays uniform throughout)
- No eraser tool within Scribble (use Ctrl+Z or Cmd+Z on Mac to undo)
- Cannot draw easily on mobile
- Limited to lines and curves (no paint bucket or fill tool)
- Drawings can't be exported as separate files
As an alternative, you can create a drawing in Google Drawings and insert it as an image into your slide. This gives you more control and a dedicated canvas to work on.
How to Add GIFs to Google Slides
GIFs only animate in Presentation (Present) mode. In edit mode, they appear as static images.
Method 1 - Upload GIF
Step 1: Save the GIF to your computer
Step 2: In Google Slides, go to Insert > Image > Upload from computer
Step 3: Select your GIF file and click Open

Method 2 - Insert by URL
Step 1: Copy the direct GIF URL from a site like Giphy or Tenor
Step 2: Go to Insert > Image > By URL
Step 3: Paste the GIF URL and click Insert
Best GIF Sources:
- Giphy is the largest GIF library on the internet
- Tenor (tenor.com) is Google-owned, excellent search engine
- You can also make your own GIFs using GIMP, Canva, or EZGif.com
Note: GIFs only animate when you are in Presentation/Present mode. In edit mode, they appear as static images.
How to Add a Voiceover to Google Slides
A voiceover is a recorded narration. Google Slides doesn't have a built-in recorder, so the process involves recording outside Slides and then importing via Google Drive.
How to Record Your Voiceover (Free Tools)
- Audacity (free for desktop, Windows/Mac, professional quality)
- GarageBand (free on Mac)
- Online Voice Recorder (no install needed, works in browser)
- Windows Voice Recorder (built into Windows)
- QuickTime Player (built into Mac)
Once recorded, export as MP3 and upload to Google Drive. Then insert it using Insert > Audio.
How to Sync Voiceover with Specific Slides
Step 1: Add a separate audio file to each slide
Step 2: In Format options, enable Stop on slide change
Step 3: Each slide plays its own narration and stops automatically when you advance

AI Voiceover Option for Google Slides
Would you rather not record your own voice? Several AI text-to-speech tools can generate voiceover audio from your script. Tools like ElevenLabs, Murf, or Descript can produce natural-sounding narration that you export as an MP3 and upload to Drive. Quality varies, but the better tools sound remarkably human.
For a full walkthrough, see our guide on adding a voiceover to Google Slides.
Google Slides Supported Media File Formats (Quick Reference)
Not sure whether your file will work? Use this table as a quick reference for Google Slides media formats before uploading.
How to Add Media to Google Slides on Different Devices
The steps above apply to Google Slides in a desktop browser, which is where most features are available. But if you're working on a different device, the steps might be a little different. Here's what you need to know about each device's specifications.
Adding Media on Windows PC or Mac
Everything in this guide applies to Windows and Mac. Use Google Slides in Chrome for the best experience and fewest compatibility issues.
Adding Media on a Chromebook
Chromebooks aren't much different. Luckily, Chromebooks run the full web version of Google Slides, so nearly everything works the same as on a desktop. A few notes:
- Use the web version at slides.google.com, not the Android app
- For audio recording on a Chromebook, either use Chrome's built-in voice recorder, any online tool like Online Voice Recorder, or the Chrome extension Screencastify
- Save your recording to Google Drive, then insert from there
Adding Media on iPhone or iPad
This is where things get more limited. The Google Slides iOS app does not support adding audio at all. It's one of the most common points of confusion.
- Audio: Cannot be added through the iOS app. Use the web version in Safari (request desktop site) instead
- Images: Can be added from your Camera Roll directly through the app
- Video: YouTube videos can be added through the app, but with some limitations
- GIFs: Can be inserted via upload through the app
See our complete guide on how to add audio on iPad.
Adding Media on Android
Android is slightly more capable than iOS for Google Slides, but shares similar limitations:
- Audio: Must use the desktop web version. The Android app doesn't support audio insertion
- Images: Can be added from your gallery through the app
- Video: YouTube embeds work through the app
- GIFs: Can be uploaded through the app
For the best experience on any mobile device, switch to a desktop browser when you need to add audio or complex media.
Troubleshooting Media Problems in Google Slides
Media issues are frustrating, especially right before a presentation. Here are the most common problems and exactly how to fix them.
Google Slides Audio Not Working
- Wrong file format → Convert your file to MP3 using an online converter
- File too large → Compress with Audacity before uploading
- Drive permissions wrong → Open the file in Google Drive, click Share, and set it to "Anyone with the link can view"
- Browser issue → Switch to Google Chrome
- Still not working → Clear your browser cache and try again
See our full guide on how to add audio to Google Slides for advanced fixes.
Google Slides Video Not Playing or Shows Black Screen
- Refresh the presentation (Ctrl+R or Cmd+R)
- Check your internet connection. YouTube videos require an active internet connection to play
- Try presenting in Chrome instead of other browsers
- If using a Google Drive video, verify the sharing permissions are set to "Anyone with the link can view"
Can't Find Audio Option in Insert Menu
- The Insert > Audio option only appears in the web version of Google Slides. You can't find it in the mobile app
- Make sure you're using slides.google.com in a browser, not the app
- Make sure you're signed into your Google account
- If the option is greyed out, your audio file may not be in Google Drive yet
Audio Plays in Edit Mode But Not When Presenting
- Click the audio icon and open Format options
- Under Audio playback, make sure Start playing is set to Automatically or On click
- Check that the presentation sharing settings allow audio to load for your audience
GIF Not Animating in Google Slides
This is expected behavior. GIFs do not animate in edit mode. They only animate when you enter Presentation mode (click Present in the top right). If your GIF isn't animating during a live presentation, try re-inserting it as a fresh upload.
Video Loads But Has No Sound
- Click the video on your slide and open Video options
- Make sure Mute audio is not checked
- Check your system volume and browser volume
- For YouTube videos, ensure the original video has audio (some YouTube videos are silent)
Frequently Asked Questions About Media in Google Slides
Create Media-Rich Presentations Faster with Slidey.io
If you've read this far, you now know how involved adding media to Google Slides can actually be. Uploading files to Drive, adjusting format options, troubleshooting permissions, working around mobile limitations, and so much more. Every step is doable, but it adds up.
That's exactly why we built Slidey.io. It's designed for people who want professional, media-rich presentations without the manual overhead.
- No Drive uploading required. Add audio and video directly from your computer
- AI-powered media placement. It automatically suggests where the media fits best in your slides
- Works on any device, including mobile, without the feature restrictions of the Slides app
- One-click professional presentations with media already built in
- Completely free to try, no credit card needed
Try Slidey.io Free — Build Your First Media Presentation in 5 Minutes →
Whether you stick with Google Slides or give Slidey.io a try, you now have everything you need to add audio, video, music, GIFs, voiceovers, and drawings to any presentation, on any device.
Explore all media guides: How to Add Audio to Google Slides | How to Add Music to Google Slides


.svg)