-01%20(1).jpg)

Posted on:
June 16, 2026
How to Loop a PowerPoint Slideshow (2026 Guide — Windows, Mac & 365)
You are at a trade show booth, your presentation runs through to the last slide, and then stops. The screen goes blank.
You are at a trade show booth, your presentation runs through to the last slide, and then stops. The screen goes blank. Visitors walk past without noticing. Knowing how to loop a PowerPoint slideshow turns that static dead end into a continuous, self-running display that works for you around the clock. This guide covers everything, including Windows, Mac, kiosk mode, specific slides, background music, PowerPoint Online, and Google Slides. So your presentation never stops running.
What Does Looping a PowerPoint Mean?
Looping a PowerPoint slideshow means the presentation automatically restarts from the first slide when it reaches the last one, playing continuously without any manual input. Instead of stopping and waiting for someone to click, the slides keep cycling in a seamless, hands-free loop.
This feature is most useful in situations where no one is standing at a keyboard to advance slides. Common use cases include:
- Trade show booths — product highlights playing continuously for walk-by visitors
- Corporate lobbies and reception areas — company announcements or welcome screens running all day
- Museum and retail kiosks — informational displays operating without staff involvement
- Event signage and digital screens — schedules, branding, or countdown slides repeating on loop
- Classroom displays — reference material or student work cycling on hallway screens
Looping works alongside automatic slide timings and kiosk mode, both of which are covered in separate sections below.
How to Loop a PowerPoint Slideshow on Windows
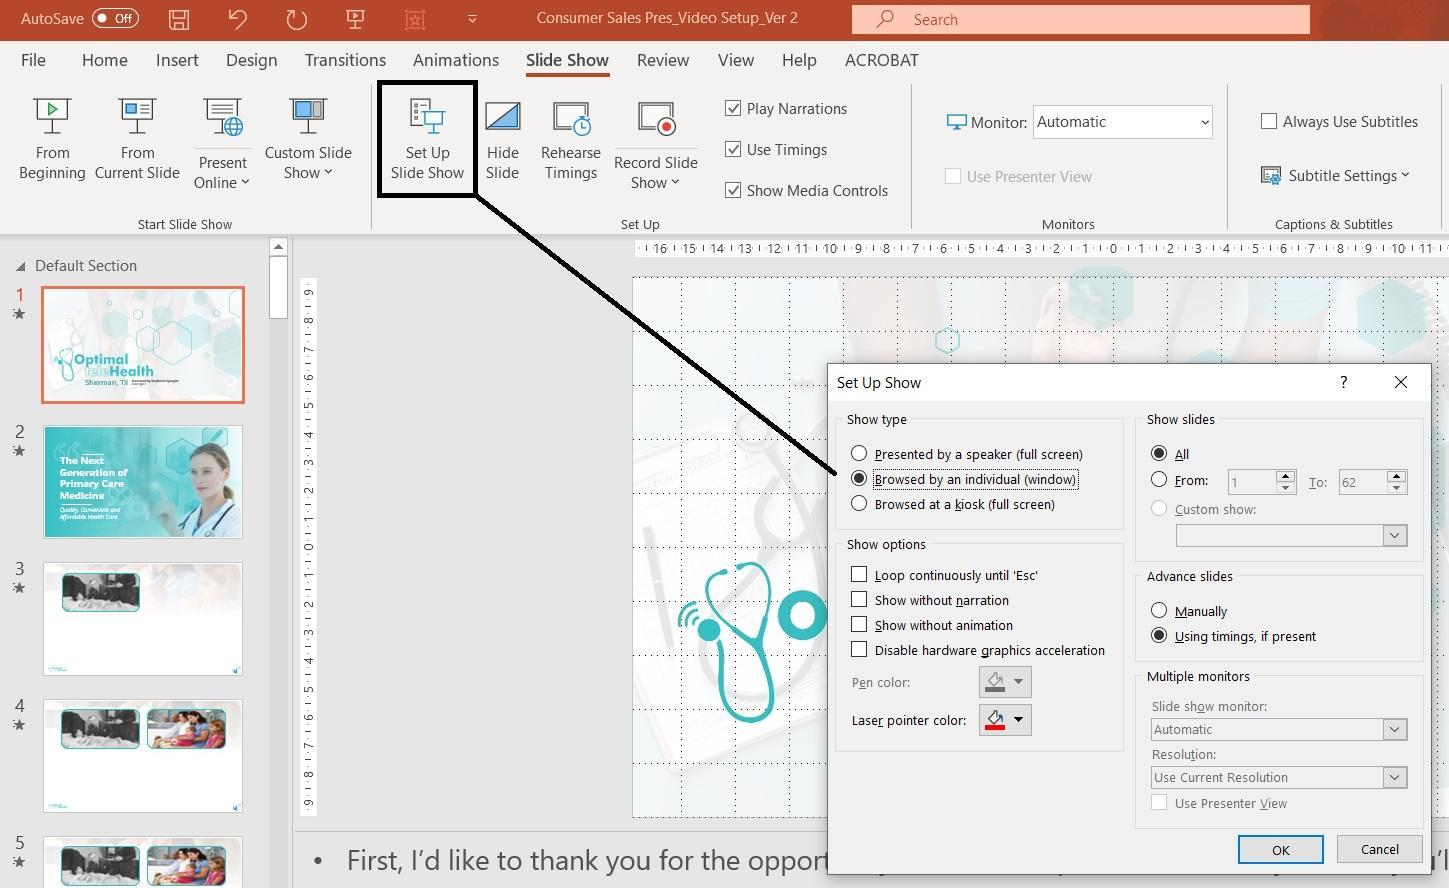
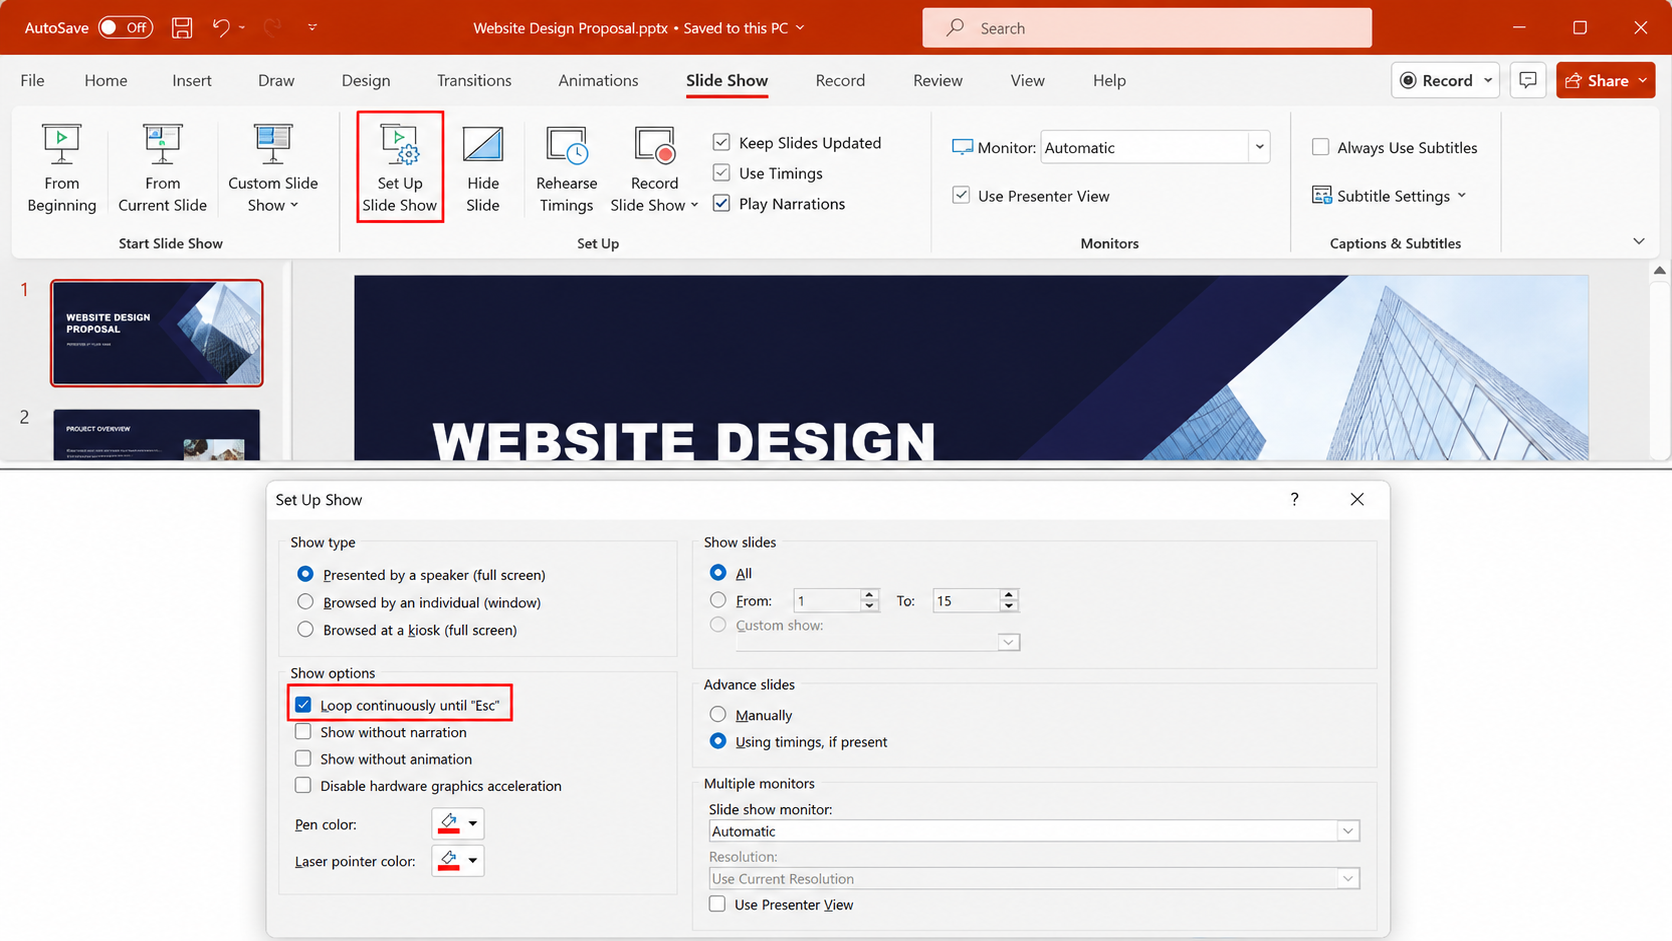
Setting up a loop on Windows is the most common method and the core feature most users need. The key steps live inside the Set Up Slide Show dialog, which most users never open.
- Open your PowerPoint presentation.
- Click the Slide Show tab in the top ribbon.
- Click Set Up Slide Show in the Set Up group.
- In the dialog box that opens, locate the Show options section.
- Check the box next to Loop continuously until 'Esc'.
- Click OK to save the setting.
Your presentation will now restart automatically from slide 1 each time it reaches the last slide. Press Esc at any time to stop the loop.
Pro Tip: Looping alone is not enough for a fully hands-free display. You also need to set automatic slide timings so slides advance without mouse clicks. Head to the Transitions tab, set a duration in the After field, and click Apply to All. Without timings, the loop will wait indefinitely on each slide for a clic
Once your loop is configured, a professionally designed slide deck makes the experience even more impactful. Explore our ready-made PowerPoint templates to elevate your presentation
How to Loop a PowerPoint on Mac
Mac steps are nearly identical to Windows, but the menu location differs slightly depending on your version of PowerPoint for Mac.
- Open your presentation in PowerPoint for Mac.
- Click the Slide Show tab in the top ribbon.
- Click Set Up Show from the ribbon options.
- In the dialog box, find the Show options section.
- Check Loop continuously until 'Esc'.
- Click OK to confirm.
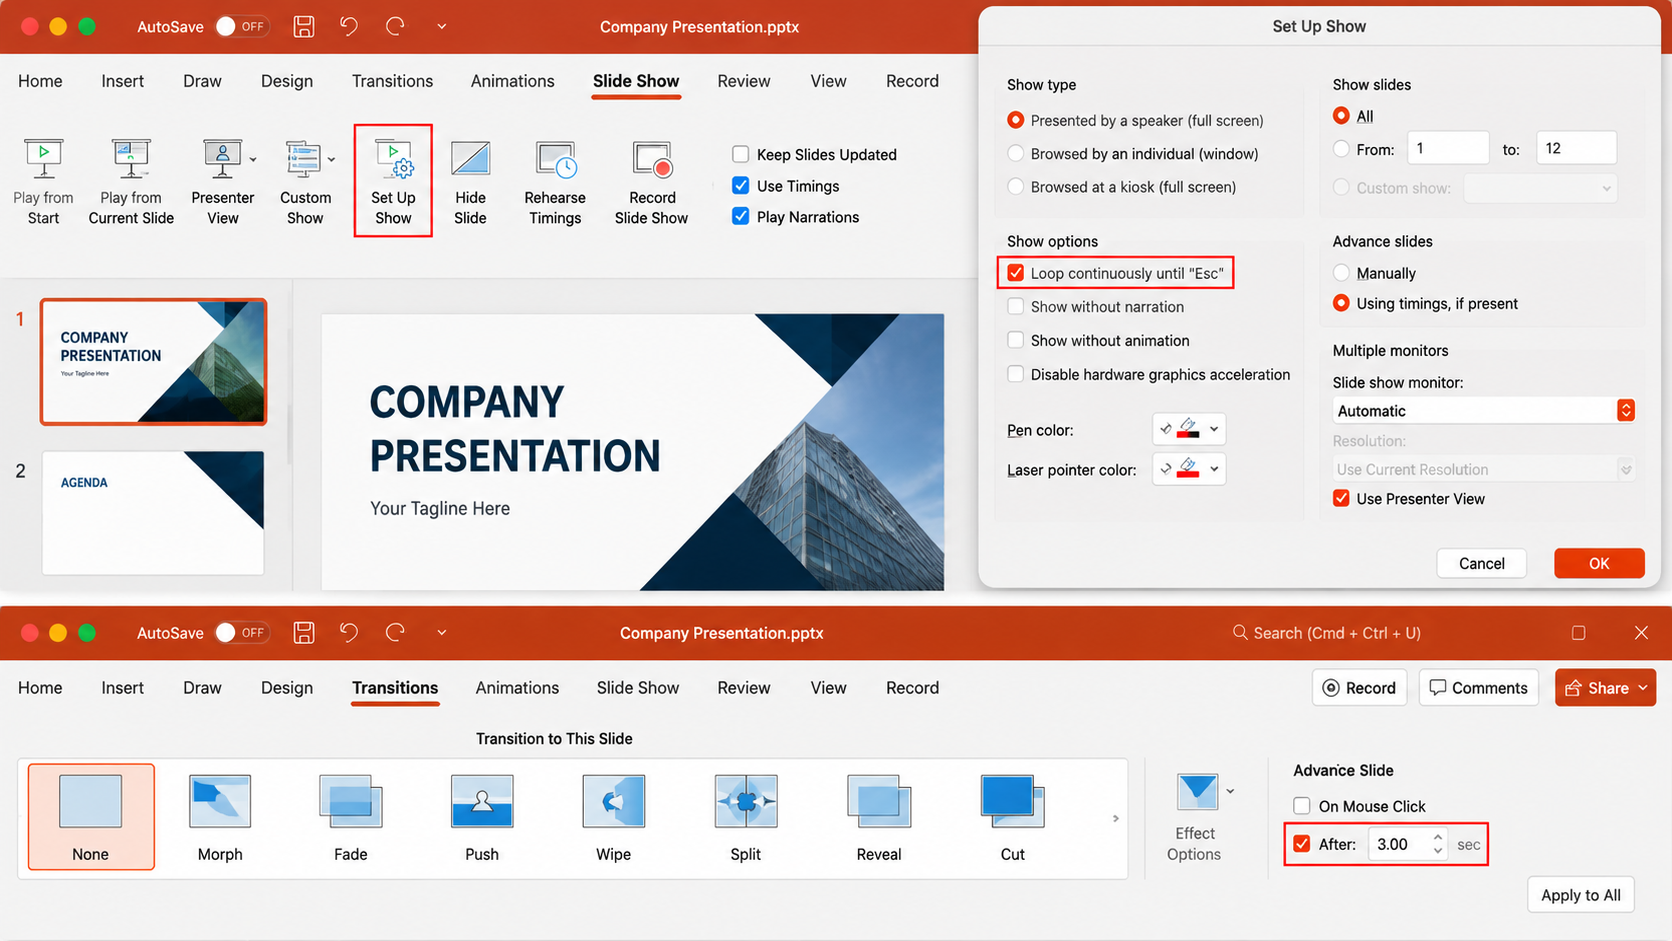
To make the loop fully automatic on Mac, go to the Transitions tab, enter a value in the After field under Advance Slide, and click Apply to All. This removes the need for any mouse clicks during the presentation
Pro Tip: In older versions of PowerPoint for Mac, the option may appear under the Slide Show menu at the top of the screen rather than the ribbon tab. If you do not see Set Up Show in the ribbon, check the top menu bar under Slide Show directly.
Mac limitation: Some PowerPoint for Mac versions may display slightly fewer preset show types in the dialog compared to Windows. The Loop continuously until 'Esc' checkbox is available on all current Mac versions, but certain advanced kiosk sub-settings may require the desktop Windows version for full control.
How to Loop Specific Slides in PowerPoint
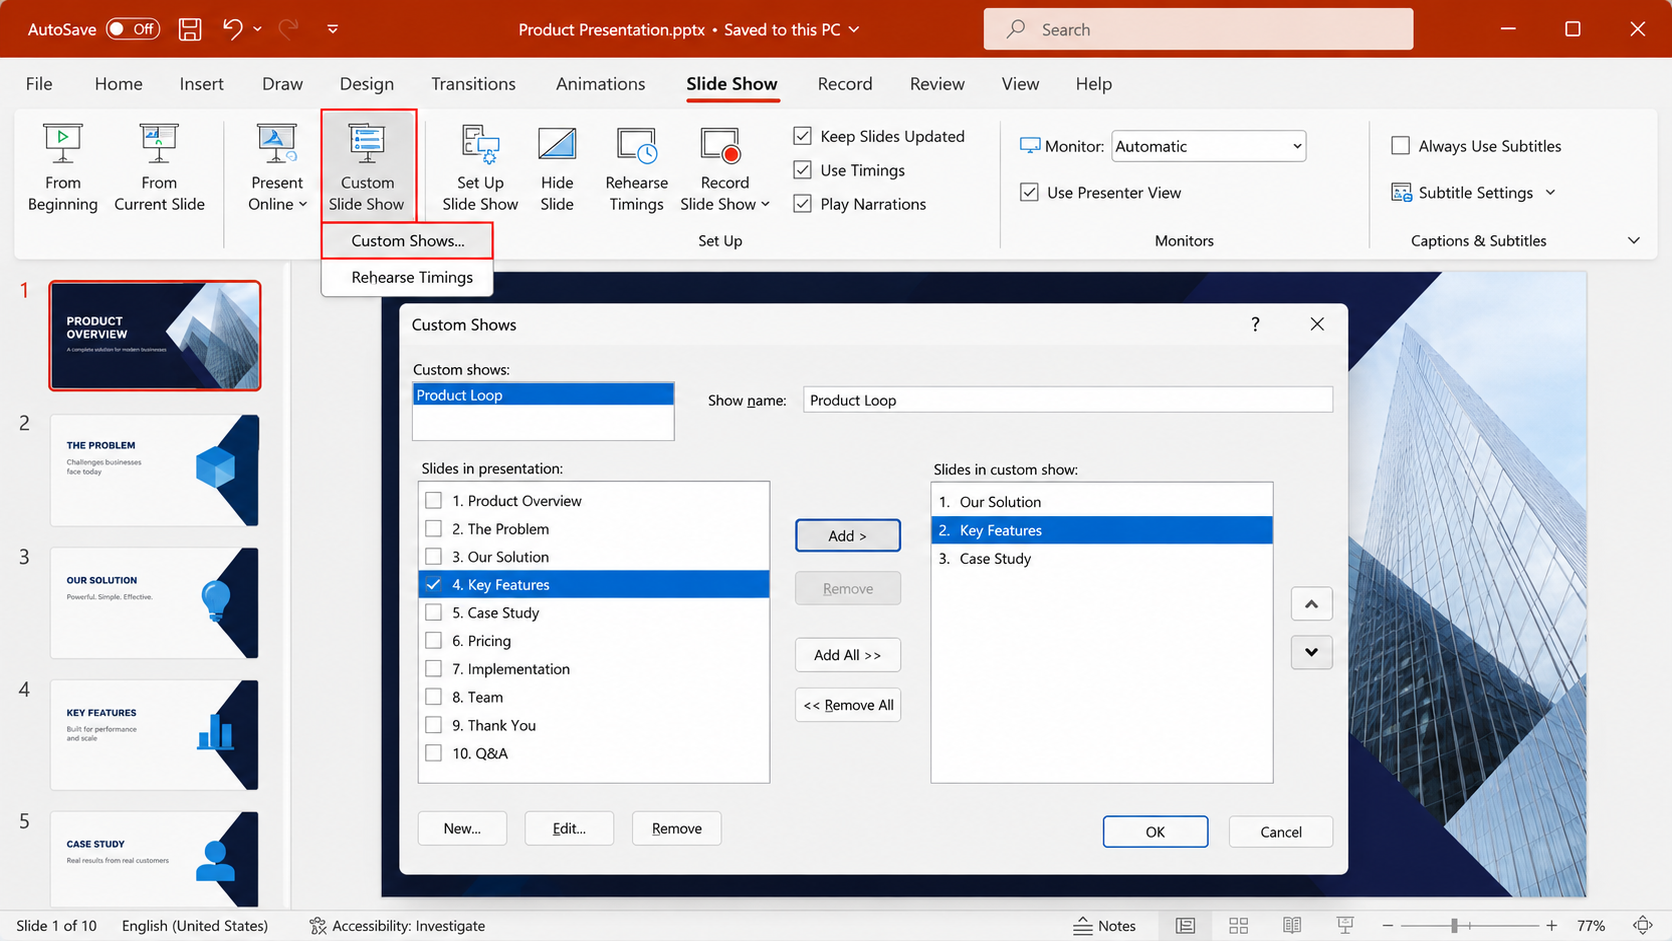
Looping the full presentation works for most cases, but sometimes you only need a subset of slides to repeat. The Custom Slide Show feature handles this exactly. It lets you define which slides loop without affecting the rest of the deck.
Common use cases: a product demo section that repeats during client walkthroughs, a break slide set that loops between sessions, or an event schedule that cycles on a side screen. Looping selected product demo slides works great for client walkthroughs and sales booths. If your sales presentations need a professional edge, we have got you covered
- Click the Slide Show tab in the top ribbon.
- Click Custom Slide Show, then select Custom Shows from the dropdown.
- In the dialog, click New to create a new custom show.
- Give the custom show a name (for example, "Product Loop").
- Select the slides you want to include from the left panel and click Add to move them to the right panel.
- Click OK, then click Close.
To run the custom show on loop, go to Slide Show > Set Up Slide Show, check Loop continuously until 'Esc', and under Show slides, select Custom show and choose the show you just created. Click OK.
Pro Tip: Name your custom shows clearly ("Lobby Loop," "Demo Section," or "Break Slides"), especially if you manage multiple versions of the same deck. This saves significant time when setting up on-site.
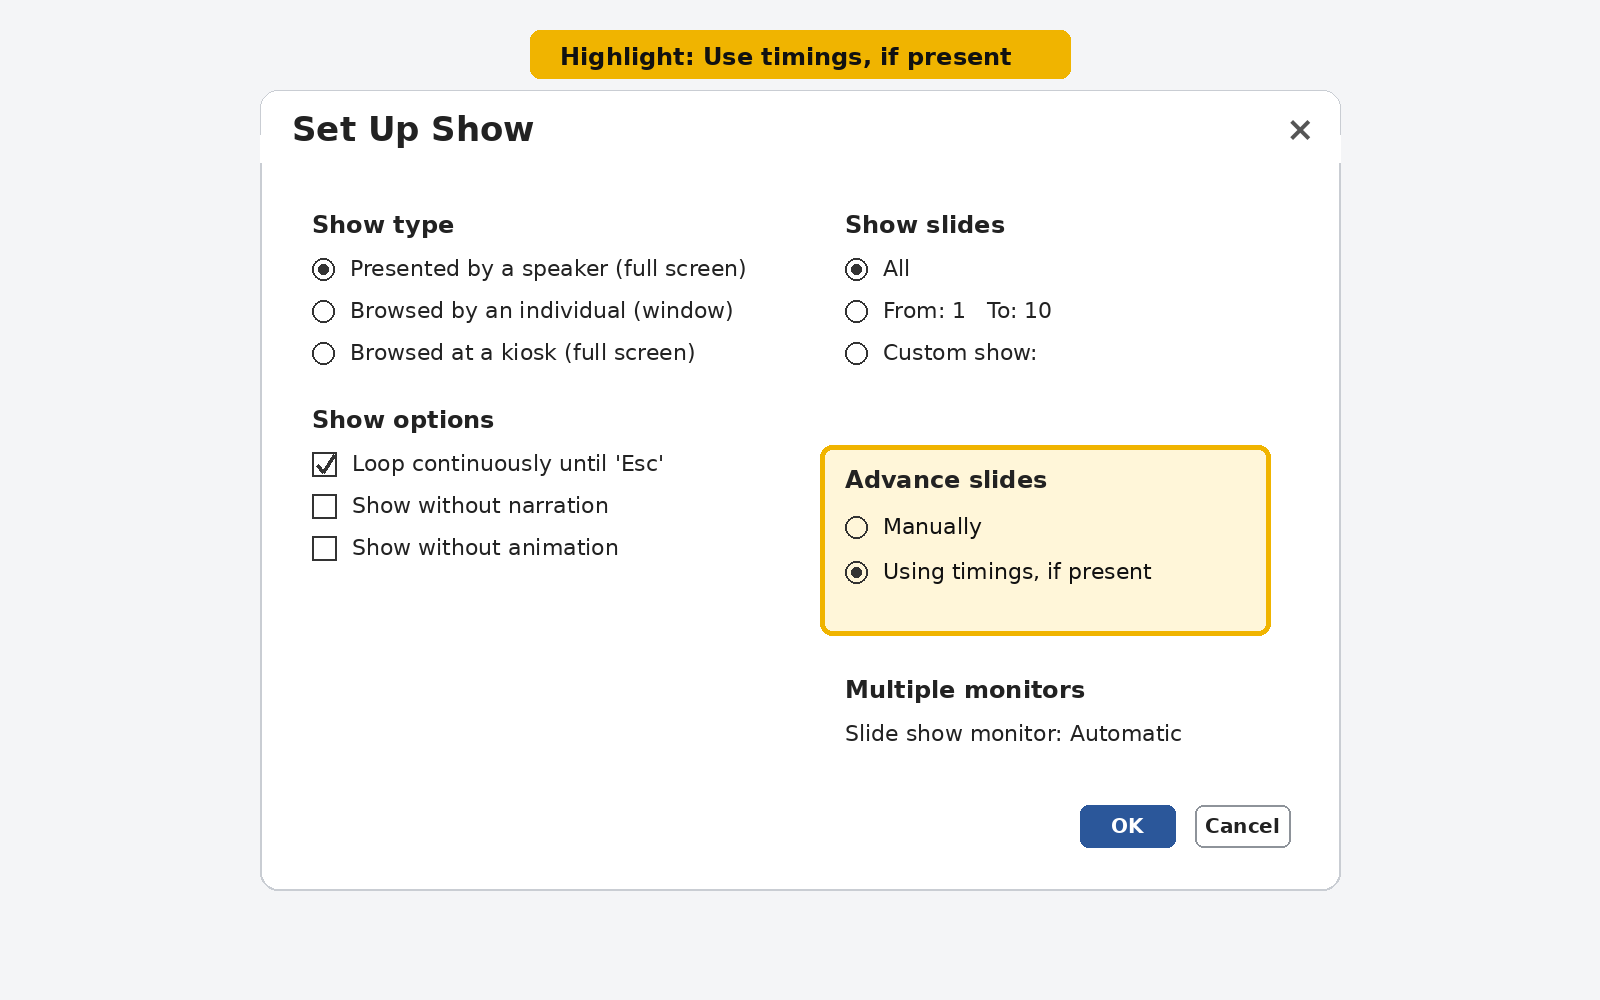
PowerPoint Kiosk Mode — Fully Automatic Loop
Kiosk mode is a distinct PowerPoint feature from standard looping. When you enable Browsed at a kiosk (full screen), PowerPoint disables all keyboard navigation and mouse clicks for advancing slides. Viewers cannot manually skip forward or backward. Slides advance only on their set timings, and the presentation loops automatically without any manual input.
This is the correct setting for lobby screens, museum displays, reception kiosks, and any unattended display where you do not want visitors accidentally controlling the slides.
- Click the Slide Show tab.
- Click Set Up Slide Show.
- Under Show type, select Browsed at a kiosk (full screen).
- PowerPoint automatically enables Loop continuously until 'Esc' when kiosk mode is selected. You do not need to check it separately.
- Click OK.

Before starting, make sure all slides have Transitions > After timings set. Without timings, kiosk mode will stall indefinitely on the first slide because no manual input is allowed.
Pro Tip: Kiosk mode and standard loop mode are not the same. Standard loop allows keyboard and mouse navigation. Kiosk mode locks all navigation. Use kiosk mode for fully unattended displays and standard loop when a presenter is nearby.
Kiosk mode is widely used in corporate lobbies, trade show booths, and reception areas where a polished, self-running display leaves a lasting impression. If you need help with corporate presentation design, our team can build it for you.
How to Set Slide Timings for Auto Advance
Looping without slide timings means the presentation pauses on each slide waiting for a click. Setting timings removes that dependency and makes the loop fully automatic.
There are two ways to apply timings: the same duration to all slides, or different durations per slide.
To set the same timing for all slides:
- Click the Transitions tab in the top ribbon.
- In the Timing group on the right, uncheck On Mouse Click.
- In the Timing group on the right, uncheck On Mouse Click.
- Click Apply to All to apply this timing across every slide in the presentation.

To set different timings per slide:
- Click on an individual slide in the slide panel.
- Go to the Transitions tab.
- Enter a specific duration in the After field for that slide.
- Repeat for each slide that needs a different timing. Do not click Apply to All — that would overwrite your individual settings.
Pro Tip: Use the Slide Sorter view (View > Slide Sorter) to see all your slide timings at a glance. Each slide will display its duration below the thumbnail, making it easy to spot slides with missing or incorrect timings before you go live.
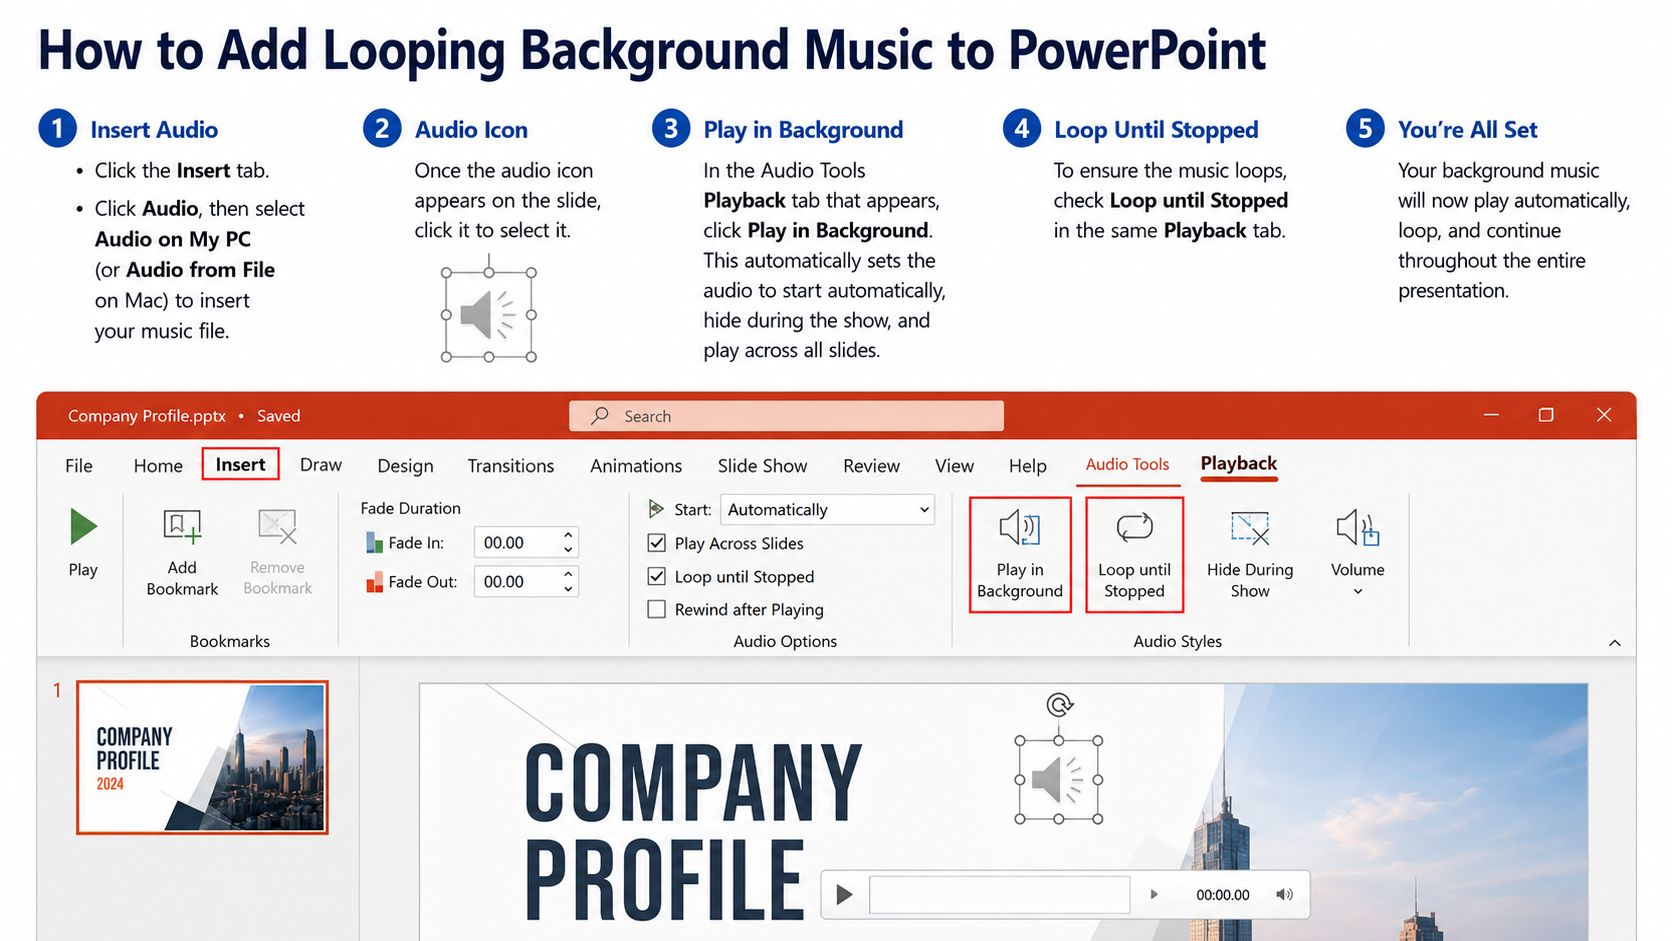
How to Add Looping Background Music to PowerPoint
Adding music that loops throughout your presentation requires a specific audio setting, not just inserting a file
- Click the Insert tab.
- Click Audio, then select Audio on My PC (or Audio from File on Mac) to insert your music file.
- Once the audio icon appears on the slide, click it to select it.
- In the Audio Tools Playback tab that appears, click Play in Background. This automatically sets the audio to start automatically, hide during the show, and play across all slides.
- To ensure the music loops, check Loop until Stopped in the same Playback tab.
Pro Tip: Match your music track length to your total slide timing. If your presentation runs for 3 minutes total and your track is 90 seconds, looping will restart the music partway through a slide. Use a longer track or a track with a natural loop point to avoid jarring restarts.
Copyright reminder: Always use royalty-free music in presentations shown publicly. Sources like YouTube Audio Library and Pixabay Music offer free, license-safe tracks.
Can You Loop PowerPoint Online (Web Version)?
PowerPoint Online, accessed through a browser at office.com, has significant limitations when it comes to looping.
The Set Up Slide Show dialog — where the loop setting lives on desktop — is not fully available in the web version. You cannot enable Loop continuously until 'Esc' through the browser interface. The only workaround is to manually restart the presentation by pressing F5 or clicking From Beginning each time it ends.
Pro Tip: If you need looping for a live display or kiosk, always use the desktop version of PowerPoint. Open the file locally, enable the loop and timings, and run from the desktop app. Web versions are suitable for editing and sharing, not for unattended playback.
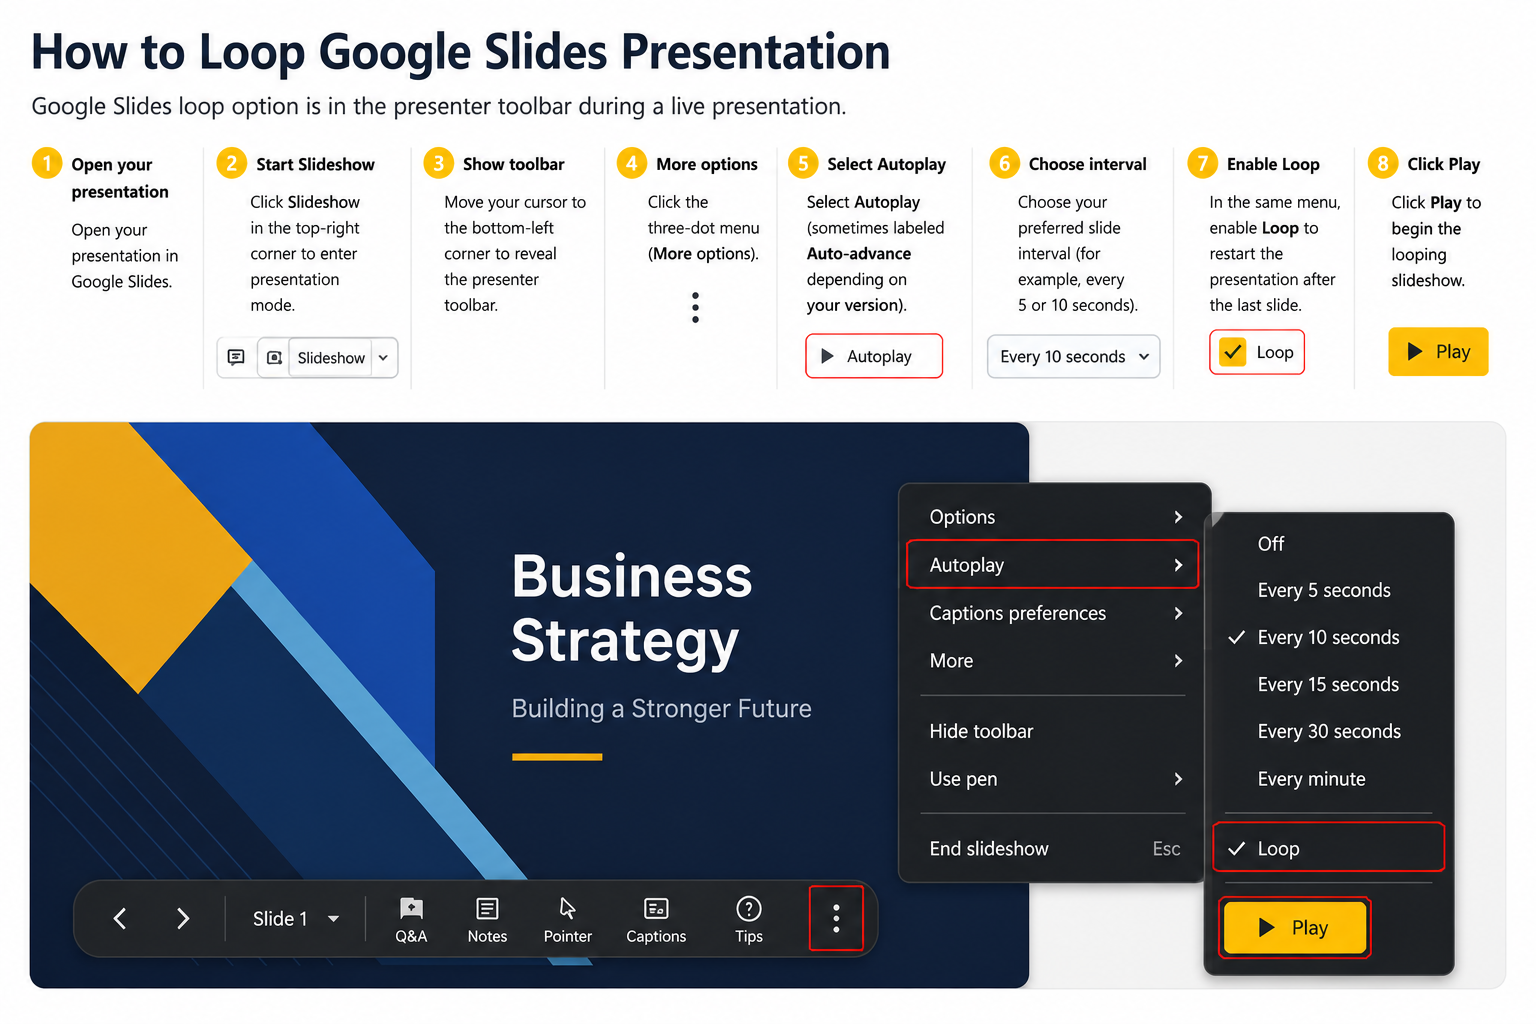
How to Loop Google Slides Presentation
Google Slides handles looping differently from PowerPoint. The loop option is built into the presenter toolbar during a live presentation session and does not require any pre-show dialog configuration. Compared to PowerPoint, the Google Slides method is faster to set up but resets each time you start a new session.
- Open your presentation in Google Slides.
- Click Slideshow in the top-right corner to enter presentation mode.
- Move your cursor to the bottom-left corner to reveal the presenter toolbar.
- Click the three-dot menu (More options).
- Select Autoplay (sometimes labeled Auto-advance depending on your version).
- Choose your preferred slide interval (for example, every 5 or 10 seconds).
- In the same menu, enable Loop to restart the presentation after the last slide.
- Click Play to begin the looping slideshow.
To stop the loop, click Pause on the toolbar or press Esc to exit presentation mode entirely. For a shareable looping link, use File > Share > Publish to the web, then enable Auto-advance slides and Restart the slideshow after the last slide before publishing..
Pro Tip: Google Slides loop settings reset every time you start a new presentation session. If you use the same deck regularly for a display, build a habit of enabling Autoplay and Loop at the start of each session rather than assuming it is still active from last time.
PowerPoint Loop Not Working? Fix It Now
If your loop is not behaving as expected, one of these five problems is almost certainly the cause. Use the table below to diagnose and fix it quickly.
Pro Tip: After making any loop or timing changes, always test your full presentation by pressing F5 from the first slide and letting it run to the end. Confirm it restarts automatically before relying on it for a live display or event.
Frequently Asked Questions
Conclusion
This guide has covered how to loop a PowerPoint presentation across every scenario: Windows and Mac setup, kiosk mode, specific slide looping, automatic timings, background music, web version limitations, and Google Slides. Setting up a loop takes less than two minutes once you know where to look. Open your presentation now, go to the Slide Show tab, and enable your loop before your next event or display. Now that you know how to loop a PowerPoint slideshow, the next step is making sure your slides look as good as they run. At Slidey, we design presentations that do not just play but actually perform.


.svg)